


A practical guide to growing mushrooms in IndiaA joint educational initiative by MushroomWale & DMR Solan
MushroomFarming.in

A joint educational initiative by

MushroomWale.com
ICAR–Directorate of Mushroom Research, Solan logoICAR–DMRSolan
← All books

Compost, step by step

Contents · choose a chapter or topic
Start here
  1. 01Compost, step by step
  2. 02What you need before starting
Understand the basics
  1. 03Preparation is not finished when heating stops
Records that make sense
  1. 04Follow one batch from input to sale
The process
  1. 05Make the material balance explicit
  2. 06Connect structure with the process
  3. 07Distinguish Phase II objectives
  4. 08Close the batch record
Inspect the system
  1. 09Know what goes into the batch
  2. 10Manage structure, water and air in Phase I
  3. 11Separate pasteurisation, conditioning and cooling
  4. 12Release and receive with traceable evidence
In the field
  1. 13A recipe starts with the material, not the bag count
  2. 14A recipe starts with the material, not the bag count · continued
  3. 15Worked example: wet mass and dry matter
  4. 16Read Phase I as a changing biological process
  5. 17Read Phase I as a changing biological process · practical sequence
  6. 18Distinguish pasteurisation, conditioning and cooling
  7. 19Distinguish pasteurisation, conditioning and cooling · continued
  8. 20What each record can and cannot establish
  9. 21Investigate the batch before changing the formula
  10. 22Write it in your farm notebook
  11. 23Where the field guidance comes from
Raw Materials
  1. 24Raw Materials
  2. 25Four jobs, not four ingredients
  3. 26What the DMR table says, and what it does not
  4. 27Inspect the lot at the gate
  5. 28Why a copied formula fails
  6. 29Read the numbers in context
  7. 30Read the numbers in context
  8. 31Read the numbers in context
  9. 32Run a gate check on the next delivery
  10. 33Avoid these mistakes
  11. 34Check your understanding
  12. 35Check your understanding
  13. 36Check your understanding
  14. 37Words used in this lesson
  15. 38Sources and field reference
Formulation
  1. 39Formulation
  2. 40The two targets
  3. 41Published Indian formulae
  4. 42Doing the arithmetic yourself
  5. 43Outside the band
  6. 44Read the numbers in context
  7. 45Read the numbers in context
  8. 46Read the numbers in context
  9. 47Rebuild your own formula on paper
  10. 48Avoid these mistakes
  11. 49Check your understanding
  12. 50Check your understanding
  13. 51Check your understanding
  14. 52Words used in this lesson
  15. 53Sources and field reference
Water & Moisture
  1. 54Water & Moisture
  2. 55Pre-wetting is the first control point
  3. 56One number per stage
  4. 57How to measure it
  5. 58Too wet and too dry
  6. 59Read the numbers in context
  7. 60Read the numbers in context
  8. 61Read the numbers in context
  9. 62Build a moisture log for one batch
  10. 63Avoid these mistakes
  11. 64Check your understanding
  12. 65Check your understanding
  13. 66Check your understanding
  14. 67Words used in this lesson
  15. 68Sources and field reference
Microbiology
  1. 69Microbiology
  2. 70Who does the work
  3. 71Heat is the meter reading
  4. 72Selectivity is the point
  5. 73What the biology costs
  6. 74Read the numbers in context
  7. 75Read the numbers in context
  8. 76Read the numbers in context
  9. 77Plot one heap instead of spot checking it
  10. 78Avoid these mistakes
  11. 79Check your understanding
  12. 80Check your understanding
  13. 81Check your understanding
  14. 82Words used in this lesson
  15. 83Sources and field reference
Phase I
  1. 84Phase I
  2. 85Three routes, three timetables
  3. 86Building the stack
  4. 87Turning is the process
  5. 88Knowing Phase I is over
  6. 89Read the numbers in context
  7. 90Read the numbers in context
  8. 91Read the numbers in context
  9. 92Write the turning calendar before you stack
  10. 93Avoid these mistakes
  11. 94Check your understanding
  12. 95Check your understanding
  13. 96Check your understanding
  14. 97Words used in this lesson
  15. 98Sources and field reference
Bunker Operation
  1. 99Bunker Operation
  2. 100What a bunker is
  3. 101Fill condition decides where air goes
  4. 102Airflow, timers and what DMR specifies
  5. 103Monitoring, not spot checking
  6. 104Read the numbers in context
  7. 105Read the numbers in context
  8. 106Read the numbers in context
  9. 107Map the air path in your own bunker
  10. 108Avoid these mistakes
  11. 109Check your understanding
  12. 110Check your understanding
  13. 111Check your understanding
  14. 112Words used in this lesson
  15. 113Sources and field reference
Aeration
  1. 114Aeration
  2. 115Rated air and delivered air
  3. 116Oxygen is the real target
  4. 117Evidence of distribution
  5. 118Acting on the evidence
  6. 119Read the numbers in context
  7. 120Read the numbers in context
  8. 121Read the numbers in context
  9. 122Test distribution on the next batch
  10. 123Avoid these mistakes
  11. 124Check your understanding
  12. 125Check your understanding
  13. 126Check your understanding
  14. 127Words used in this lesson
  15. 128Sources and field reference
Phase II
  1. 129Phase II
  2. 130The four stages in order
  3. 131Filling the tunnel
  4. 132Rates, not only setpoints
  5. 133Release boundaries
  6. 134Read the numbers in context
  7. 135Read the numbers in context
  8. 136Read the numbers in context
  9. 137Write the run sheet before filling
  10. 138Avoid these mistakes
  11. 139Check your understanding
  12. 140Check your understanding
  13. 141Check your understanding
  14. 142Words used in this lesson
  15. 143Sources and field reference
Pasteurization
  1. 144Pasteurization
  2. 145What the heat is for
  3. 146A narrow window
  4. 147Where you measure decides everything
  5. 148When there is no steam line
  6. 149Read the numbers in context
  7. 150Read the numbers in context
  8. 151Read the numbers in context
  9. 152Prove your hold on the next batch
  10. 153Avoid these mistakes
  11. 154Check your understanding
  12. 155Check your understanding
  13. 156Check your understanding
  14. 157Words used in this lesson
  15. 158Sources and field reference
Conditioning
  1. 159Conditioning
  2. 160Two conditionings, one purpose
  3. 161Where the ammonia goes
  4. 162Oxygen is the quiet input
  5. 163Knowing when it is finished
  6. 164Read the numbers in context
  7. 165Read the numbers in context
  8. 166Read the numbers in context
  9. 167Map one conditioning hold
  10. 168Avoid these mistakes
  11. 169Check your understanding
  12. 170Check your understanding
  13. 171Check your understanding
  14. 172Words used in this lesson
  15. 173Sources and field reference
Ammonia
  1. 174Ammonia
  2. 175Where it comes from
  3. 176Smell is not concentration
  4. 177Four questions before you decide
  5. 178What it looks like after spawning
  6. 179Read the numbers in context
  7. 180Read the numbers in context
  8. 181Build an honest ammonia record
  9. 182Avoid these mistakes
  10. 183Check your understanding
  11. 184Check your understanding
  12. 185Check your understanding
  13. 186Words used in this lesson
  14. 187Sources and field reference
Tunnel Operation
  1. 188Tunnel Operation
  2. 189One circuit, not one box
  3. 190The fill decides the batch
  4. 191The three temperatures
  5. 192What the nameplate cannot tell you
  6. 193Read the numbers in context
  7. 194Read the numbers in context
  8. 195Read the numbers in context
  9. 196Inspect the tunnel before the next fill
  10. 197Avoid these mistakes
  11. 198Check your understanding
  12. 199Check your understanding
  13. 200Check your understanding
  14. 201Words used in this lesson
  15. 202Sources and field reference
Sensors
  1. 203Sensors
  2. 204What a reading actually is
  3. 205Where probes go
  4. 206The boring checks
  5. 207Disagreement is information
  6. 208Read the numbers in context
  7. 209Read the numbers in context
  8. 210Read the numbers in context
  9. 211Draw your tunnel probe map
  10. 212Avoid these mistakes
  11. 213Check your understanding
  12. 214Check your understanding
  13. 215Check your understanding
  14. 216Words used in this lesson
  15. 217Sources and field reference
Quality Control
  1. 218Quality Control
  2. 219Release is a decision with a name on it
  3. 220The checks DMR puts numbers on
  4. 221The moisture figure that has two answers
  5. 222Write down what you did not check
  6. 223Read the numbers in context
  7. 224Read the numbers in context
  8. 225Read the numbers in context
  9. 226Write a one page release sheet
  10. 227Avoid these mistakes
  11. 228Check your understanding
  12. 229Check your understanding
  13. 230Check your understanding
  14. 231Words used in this lesson
  15. 232Sources and field reference
Sampling
  1. 233Sampling
  2. 234Ask the question first
  3. 235Where the variation lives
  4. 236Composite without hiding a failure
  5. 237Label, seal and record
  6. 238Read the numbers in context
  7. 239Read the numbers in context
  8. 240Read the numbers in context
  9. 241Sample one batch properly
  10. 242Avoid these mistakes
  11. 243Check your understanding
  12. 244Check your understanding
  13. 245Check your understanding
  14. 246Words used in this lesson
  15. 247Sources and field reference
Troubleshooting
  1. 248Troubleshooting
  2. 249Describe before you diagnose
  3. 250List competing causes
  4. 251Let the numbers name the domain
  5. 252Measure next, do not spray next
  6. 253Read the numbers in context
  7. 254Read the numbers in context
  8. 255Read the numbers in context
  9. 256Run one structured investigation
  10. 257Avoid these mistakes
  11. 258Check your understanding
  12. 259Check your understanding
  13. 260Check your understanding
  14. 261Words used in this lesson
  15. 262Sources and field reference
Hygiene
  1. 263Hygiene
  2. 264One direction only
  3. 265The movements that break it
  4. 266End of crop and spent compost
  5. 267Chemicals are not the plan
  6. 268Read the numbers in context
  7. 269Read the numbers in context
  8. 270Read the numbers in context
  9. 271Map the dirty to clean route
  10. 272Avoid these mistakes
  11. 273Check your understanding
  12. 274Check your understanding
  13. 275Check your understanding
  14. 276Words used in this lesson
  15. 277Sources and field reference
Batch Records
  1. 278Batch Records
  2. 279What a batch record holds
  3. 280Start with what you actually used
  4. 281The process states worth logging
  5. 282Carry the number forward
  6. 283Read the numbers in context
  7. 284Read the numbers in context
  8. 285Read the numbers in context
  9. 286Rebuild your batch sheet
  10. 287Avoid these mistakes
  11. 288Check your understanding
  12. 289Check your understanding
  13. 290Check your understanding
  14. 291Words used in this lesson
  15. 292Sources and field reference
Practise and review
  1. 293Mistakes to avoid
  2. 294Review a deliberately incomplete batch sheet
Sources and next steps
  1. 295Keep learning with the field guides

Start here

Chapter opening

Compost, step by step

Learn the eighteen compost lessons as one batch workflow. Formulation, material structure, aeration, biological activity, treatment and release belong together; a recipe by weight alone is not a process.

Read one page, study its picture, then turn to the next. Use Contents whenever you want a particular topic.
Compost, step by step01

Start here

Practical workbook

What you need before starting

Keep these beside you while you learn. You do not need to buy equipment just to read this book.

  1. One complete, applicable compost method

  2. Ingredient identities, weights and moisture basis

  3. Batch map, instrument locations and operator release criteria

Compost, step by step02

Understand the basics

Look closely

Preparation is not finished when heating stops

A preparation method includes what happens after treatment: cooling, moisture adjustment where applicable, handling, inoculation and containment. Treated material placed back beside dirty tools or raw inputs can be exposed again before the intended fungus establishes.

Plan the next container, work surface, tools and staff movements before starting. Follow the selected method for release and handling conditions; a container that is covered is not necessarily sterile, cool enough or suitable for inoculation.

Pasteurisation and sterilisation describe different process objectives. Neither word supplies a complete operating procedure. Do not improvise a pressure vessel or borrow a heating schedule from another load size, material or crop.

Compost, step by step03

The process

Practical workbook

Make the material balance explicit

The moisture in received material contributes to its weight. Comparing wet tonnes without identifying water and dry matter can change the formulation unintentionally. Ingredient identity and variability matter as well as arithmetic.

Compost, step by step05

The process

Practical workbook

Connect structure with the process

A compact wet pocket and a looser outer region do not experience identical conditions. Treat turning, loading and aeration as part of the chosen method, not as interchangeable calendar events.

Compost, step by step06

The process

Practical workbook

Distinguish Phase II objectives

Pasteurisation, conditioning and cooling serve different functions. The process must be assessed in the loaded material, not only from an air display. Completion of one heating period is not automatic permission to spawn.

Compost, step by step07

The process

Practical workbook

Close the batch record

Receiving results and later crop performance belong to the same lot history. When a crop problem appears, a traceable record lets the team compare batches without guessing which ingredients or process changes were involved.

Compost, step by step08

Inspect the system

Practical workbook

Know what goes into the batch

A compost batch starts with identifiable inputs, not an unlabelled heap. Ingredient condition and moisture change what a weighed load contributes.

Check straw condition, ingredient identity, storage protection and the basis used in the selected formulation.

Compost, step by step09

Inspect the system

Practical workbook

Manage structure, water and air in Phase I

Phase I transforms the mixed materials. Moisture, the spaces between particles and air movement act together; a dense wet pocket can behave differently from the rest of a batch.

Compare representative locations and review the actual wetting, mixing, turning or aeration sequence. One temperature reading is not a batch profile.

Compost, step by step10

Inspect the system

Practical workbook

Separate pasteurisation, conditioning and cooling

In a short-method system, Phase II is a controlled sequence with distinct objectives. Heating alone does not demonstrate completion of conditioning or readiness for spawn.

Check filling uniformity, air passage through the load, sensor placement, process records and the approved release criteria.

Compost, step by step11

Inspect the system

Practical workbook

Release and receive with traceable evidence

Link the finished material to its production history. Purchased Phase II compost and colonised Phase III compost are different handovers; establish exactly what was supplied.

Reconcile supplier records, transport conditions, arrival observations and the agreed spawning or receiving requirements.

Compost, step by step12

In the field

Field notes

A recipe starts with the material, not the bag count

Straw and manure deliveries vary in moisture, structure and composition. Record the source, receipt date, storage condition and as-received weight of each lot. A formula copied as truckloads or bags can change substantially when a new supplier delivers wetter or denser material. Keep the weight basis visible whenever you compare two recipes.

Use one documented formulation suited to the available process. List what each ingredient contributes and who may authorise substitutions. If laboratory results are available, record the test method, sample identity and whether values are expressed on a wet or dry basis. A chemical analysis cannot replace physical structure: air still needs pathways through the prepared mass.

Compost, step by step13

In the field

Field notes

A recipe starts with the material, not the bag count · continued

During wetting, assess uniformity across the material. Water that drains away does not become useful substrate moisture, and visibly wet outer straw does not establish that the centre is equally wetted. Record additions and representative checks so the next operator understands how the batch reached its present condition.

Compost, step by step14

In the field

Field notes

Worked example: wet mass and dry matter

For a hypothetical 100 kg lot containing 30% moisture on a wet basis, dry matter is 70 kg. A second 100 kg lot at 50% moisture contains only 50 kg dry matter. The truck weight is identical, but the amount of dry material differs. This explains a mass balance; it is not a compost recipe.

  • Dry matter = wet mass × (1 − moisture fraction)
  • 100 × (1 − 0.30) = 70 kg
  • 100 × (1 − 0.50) = 50 kg
Compost, step by step15

In the field

Field notes

Read Phase I as a changing biological process

The first phase changes the raw material through microbial activity. Temperature is one sign of that activity, but a high peak does not describe the condition of the whole mass. Record several positions and interpret the pattern with moisture, structure, additions and turning or aeration events. Keep sensor location on the same chart as the reading.

Compare what happened before a change. Did the batch become compacted? Was a different lot introduced? Did aeration stop? Was water added unevenly? These questions help decide what evidence is missing before an operator changes the process. Follow the established method for the system; an outdoor heap and an aerated bunker should not be forced into one identical calendar.

Compost, step by step16

In the field

Practical workbook

Read Phase I as a changing biological process · practical sequence

  1. Before an operation: Record readings and note where the material looks or behaves differently.

  2. During an operation: Write the time, additions, turning or aeration change, and any equipment interruption.

  3. After an operation: Measure at the planned locations again and compare the trend rather than a single peak.

Compost, step by step17

In the field

Field notes

Distinguish pasteurisation, conditioning and cooling

Phase II is a controlled treatment of the compost with more than one objective. The pasteurisation stage and subsequent conditioning have different purposes. Completing a heating stage is therefore not, by itself, permission to add spawn. The process must also produce a suitable, conditioned material and bring it to the appropriate spawning condition.

Uniform loading and airflow matter because the air display and the coldest or warmest material location can differ. A time-and-temperature record should identify its measurement points. Record interruptions and corrective action instead of concealing gaps in the chart. Tunnel and steam-system operation needs a trained operator and a process suitable for the actual load and equipment.

Compost, step by step18

In the field

Field notes

Distinguish pasteurisation, conditioning and cooling · continued

At release, use the defined specification for the selected compost system, including its ammonia assessment, temperature, moisture and physical condition. Do not use a deliberate smell test to establish gas safety or substitute for the relevant measurement. Store the release decision with the batch, and keep unresolved material separate from accepted material.

Compost, step by step19

In the field

Compare the evidence

What each record can and cannot establish

What each record can and cannot establish
RecordIt helps establishIt cannot establish alone
Air temperature chartConditions at the air sensorTemperature at every point in the compost
Mapped compost readingsSpatial variation and responseAll aspects of maturity or hygiene
Ammonia assessmentOne release criterion under the chosen methodA complete quality certificate
Crop result linked to batchHow the delivered batch performed in contextThat compost caused every later crop problem
Compost, step by step20

In the field

Field notes

Investigate the batch before changing the formula

If colonisation is poor, compare retained records from successful and unsuccessful batches. Start with delivered raw materials, moisture basis, mixing, loading, process continuity, cooling and transport. Then check spawn, handling and the receiving grow room. Altering the nitrogen addition immediately can hide a process or handling failure and create a new variable in the next batch.

Make the review specific enough to change one future decision. ‘Compost bad’ is not useful; ‘rear sensor remained cooler after filling density changed’ is an observation that can be investigated. Record the proposed change, its reason and what result would support or contradict the explanation. Use the testing and process-control guides for the relevant measurements.

Compost, step by step21

In the field

Field notes

Write it in your farm notebook

Batch ID; material lots and weights; moisture basis; formulation revision; preparation events; sensor locations; process chart; release checks; dispatch details; receiving crop IDs; final crop observations.

Compost, step by step22

Raw Materials

Chapter opening

Raw Materials

Wheat straw can mean a bright dry bale or a grey heap already rotting in the rain. Compost is never better than the lot you accept.

  • By the end you can name the job each material does in the mix.
  • By the end you can read DMR nitrogen figures and say why your own lot differs.
  • By the end you can inspect and log a delivery before it is tipped.
Compost, step by step24

Raw Materials

Field notes

Four jobs, not four ingredients

Every compost mix has four jobs. Straw supplies carbon, the energy food of microbes, and the open structure that lets air move. Chicken manure, wheat bran, oil cakes and fertilisers such as urea or calcium ammonium nitrate supply nitrogen, the protein food. Gypsum is the conditioner: it keeps the mass open and adds calcium. Water carries everything.

If you buy a material without knowing its job, you cannot repair the mix when one job falls short. Wheat straw, paddy straw and farmyard manure are what most Indian yards actually have, so plan around them.

Compost, step by step25

Raw Materials

Field notes

What the DMR table says, and what it does not

The ICAR-DMR raw material table gives typical dry weight values: wheat straw about 0.6 per cent nitrogen, deep litter chicken manure 3.0 per cent, wheat bran 2.0 per cent, soybean meal 6.5 per cent and cotton seed meal 7.0 per cent.

These are typical values, not your values. A worked example in the same chapter uses chicken manure at 2.6 per cent and straw at 0.40 per cent. Manure from a young flock on fresh litter is not manure scraped off a shed floor after a year. Start from the table, then test your own lot when a laboratory is reachable.

Compost, step by step26

Raw Materials

Field notes

Inspect the lot at the gate

Judge every delivery before it is tipped. Straw should be bright, dry, springy and free of black or grey mould. A sour cellar smell means it has already fermented and lost carbon you paid for. DMR asks for freshly harvested material chopped to about 5 to 8 cm. Manure should be crumbly, not a slurry.

  • Look: colour, mould patches, foreign matter, soil.
  • Feel: dry and springy, or damp and matted.
  • Smell: clean straw, not sour or mouldy.
  • Weigh it yourself; do not count trolleys.
  • Log supplier, date, weight and condition.
Compost, step by step27

Raw Materials

Field notes

Why a copied formula fails

A formula is arithmetic done on particular materials. If your manure holds less nitrogen than the manure it was written for, the same weights give a weaker mix, the heap heats poorly and moulds that live on carbohydrate move in. If it holds more, nitrogen escapes as ammonia and yellow moulds follow.

Size matters too. DMR warns against composting less than 300 kg of base material, because a smaller pile cannot hold the temperature it needs. Keep a lot record so next season you can explain a good batch and a bad one.

Compost, step by step28

Raw Materials

Compare the evidence

Read the numbers in context

These figures belong to the named source and method. Historical costs are not current quotations. A value without its stage, material basis or measurement location is not a farm instruction.

Source-specific reference figures
What is measuredValue and basisSource and limitation
Straw chop length5-8 cmICAR-DMR manual, 2011. freshly harvested material, before stacking
Wheat straw nitrogen0.6 % of dry weightICAR-DMR manual, 2011. table value; one worked example uses 0.40
Compost, step by step29

Raw Materials

Compare the evidence

Read the numbers in context

These figures belong to the named source and method. Historical costs are not current quotations. A value without its stage, material basis or measurement location is not a farm instruction.

Source-specific reference figures
What is measuredValue and basisSource and limitation
Chicken manure nitrogen3.0 % of dry weightICAR-DMR manual, 2011. deep litter; the same chapter uses 2.6
Minimum batch300 kg of base materialICAR-DMR manual, 2011. smaller piles never reach composting temperature
Compost, step by step30

Raw Materials

Compare the evidence

Read the numbers in context

These figures belong to the named source and method. Historical costs are not current quotations. A value without its stage, material basis or measurement location is not a farm instruction.

Source-specific reference figures
What is measuredValue and basisSource and limitation
Water for wetting4000 litres per tonneICAR-DMR manual, 2011. long method, cemented yard
Compost, step by step31

Raw Materials

Practical workbook

Run a gate check on the next delivery

Record: Supplier, date, material, weight, condition notes and the accept or reject decision.

  1. Take three handfuls from different parts of the load.

  2. Note colour, mould, smell and how springy the straw feels.

  3. Weigh the load yourself and compare it with the bill.

  4. Chop a sample and check it near 5 to 8 cm.

  5. Accept, discount or reject, and write the reason down.

Compost, step by step32

Raw Materials

Pause and recall

Avoid these mistakes

  • Buying straw by eye and paying by the trolley; formulae are written in kilograms.
  • Taking rain soaked straw because it is cheap; the carbon is already gone.
  • Copying a neighbour's weights without knowing the nitrogen in your own manure.
Compost, step by step33

Raw Materials

Pause and recall

Check your understanding

Choose your answer before opening the explanation. This is a learning exercise, not a competency assessment.

Gypsum is added mainly to:

  1. Keep the mass open and supply calcium
  2. Add nitrogen
  3. Kill insects
  4. Raise heap temperature
See the answer and why

Keep the mass open and supply calcium It is the conditioner, not a nitrogen source.

Compost, step by step34

Raw Materials

Pause and recall

Check your understanding

Choose your answer before opening the explanation. This is a learning exercise, not a competency assessment.

DMR lists deep litter chicken manure at about:

  1. 3.0 per cent nitrogen
  2. 0.6 per cent nitrogen
  3. 7.0 per cent nitrogen
  4. 0.4 per cent nitrogen
See the answer and why

3.0 per cent nitrogen 0.6 is wheat straw, 7.0 is cotton seed meal.

Compost, step by step35

Raw Materials

Pause and recall

Check your understanding

Choose your answer before opening the explanation. This is a learning exercise, not a competency assessment.

A pile of only 150 kg of straw is:

  1. Too small to hold composting temperature
  2. Ideal for a trial
  3. Fine if turned daily
  4. Better than 300 kg
See the answer and why

Too small to hold composting temperature DMR sets 300 kg of base material as the floor.

Compost, step by step36

Formulation

Chapter opening

Formulation

A compost formula is not a recipe handed down by a neighbour. It is arithmetic on the materials standing in your own yard this week.

  • By the end you can state the nitrogen and carbon to nitrogen targets at stacking.
  • By the end you can compute the nitrogen of a mix from dry weights.
  • By the end you can say what goes wrong outside the nitrogen band.
Compost, step by step39

Formulation

Field notes

The two targets

DMR sets the compounding mixture at 1.5 to 1.75 per cent nitrogen on a dry weight basis at stacking. The mineral table in the same chapter prints 1.5 to 1.8 per cent, so treat the upper edge as soft and never round upward on purpose.

The second target is the carbon to nitrogen ratio, written C:N. It is adjusted to 25 to 30 parts carbon for each part nitrogen at stacking, and falls to about 16:1 in finished compost. Both targets describe one mix from two sides: how much protein food is present, and how much energy food sits around it.

Compost, step by step40

Formulation

Field notes

Published Indian formulae

The formulation DMR calls widely used in India, for the short method, is wheat straw 1000 kg, chicken manure 500 kg, urea 15 kg, wheat bran 75 kg and gypsum 30 kg. The DMR indoor method uses wheat straw 1000 kg, poultry manure 500 kg, wheat bran 70 kg, cotton seed cake 20 kg and gypsum 40 kg.

As a rule of thumb DMR gives 0.7 to 0.8 tonne of chicken manure and 0.05 to 0.15 tonne of gypsum per tonne of straw, gypsum going in at the third turning. Older formulae also list BHC or lindane, an insecticide now banned in India. Read those lines as history.

Compost, step by step41

Formulation

Field notes

Doing the arithmetic yourself

Take each material, convert its wet weight to dry weight using its moisture, multiply the dry weight by its nitrogen per cent, and add the results. Divide that total by the total dry weight and you have the nitrogen of your mix.

If the answer lands below the band, add a nitrogen carrier such as bran, an oil cake or a nitrogen fertiliser. If it lands above, add straw rather than cutting manure to nothing, because straw is also your structure. Write the assumed nitrogen of every material beside the sum.

Compost, step by step42

Formulation

Field notes

Outside the band

Below 1.5 per cent nitrogen, DMR reports that the compost does not ferment properly, the heap may not pass 55 to 60 degrees Celsius, and moulds such as Stachybotrys move in.

Above 1.75 per cent the ratio is wrong, more nitrogen escapes as ammonia, and the yellow mould Sepedonium often follows and can cut yield badly. The method also shows in the finished nitrogen: DMR reports about 1.75 to 2.0 per cent for long method compost, 2.0 to 2.2 for the short method and 2.2 to 2.5 for indoor compost.

Compost, step by step43

Formulation

Compare the evidence

Read the numbers in context

These figures belong to the named source and method. Historical costs are not current quotations. A value without its stage, material basis or measurement location is not a farm instruction.

Source-specific reference figures
What is measuredValue and basisSource and limitation
Nitrogen at stacking1.5-1.75 % of dry weightICAR-DMR manual, 2011. the same chapter's table says 1.5 to 1.8
C:N ratio at stacking25-30 to 1ICAR-DMR manual, 2011. falls to about 16:1 in finished compost
Compost, step by step44

Formulation

Compare the evidence

Read the numbers in context

These figures belong to the named source and method. Historical costs are not current quotations. A value without its stage, material basis or measurement location is not a farm instruction.

Source-specific reference figures
What is measuredValue and basisSource and limitation
Chicken manure per tonne of straw0.7-0.8 tonneICAR-DMR manual, 2011. gypsum 0.05 to 0.15 tonne, at third turning
Finished nitrogen, long method1.75-2.0 % of dry weightICAR-DMR manual, 2011. short method 2.0 to 2.2, indoor 2.2 to 2.5
Compost, step by step45

Formulation

Compare the evidence

Read the numbers in context

These figures belong to the named source and method. Historical costs are not current quotations. A value without its stage, material basis or measurement location is not a farm instruction.

Source-specific reference figures
What is measuredValue and basisSource and limitation
Nitrogen floor1.5 % of dry weightICAR-DMR manual, 2011. below this the heap may not pass 55 degrees
Compost, step by step46

Formulation

Practical workbook

Rebuild your own formula on paper

Record: Batch number, each material with wet weight, assumed moisture and nitrogen, computed mix nitrogen, and what changed.

  1. Write your last batch as weights of straw, manure, bran and gypsum.

  2. Beside each, write the nitrogen per cent you assume and its source.

  3. Work out the mix nitrogen on a dry weight basis.

  4. Compare with 1.5 to 1.75 per cent and adjust one material.

  5. File the sheet with the batch number for comparison.

Compost, step by step47

Formulation

Pause and recall

Avoid these mistakes

  • Copying weights from a bulletin while using manure of unknown nitrogen.
  • Pushing nitrogen higher for a bigger crop; it leaves as ammonia instead.
  • Leaving out gypsum to save money; the mass goes greasy and airless.
Compost, step by step48

Formulation

Pause and recall

Check your understanding

Choose your answer before opening the explanation. This is a learning exercise, not a competency assessment.

At stacking, DMR adjusts C:N to about:

  1. 25 to 30 to 1
  2. 16 to 1
  3. 8 to 1
  4. 60 to 1
See the answer and why

25 to 30 to 1 16:1 is where finished compost lands, not where you start.

Compost, step by step49

Formulation

Pause and recall

Check your understanding

Choose your answer before opening the explanation. This is a learning exercise, not a competency assessment.

Your mix computes to 2.1 per cent nitrogen. Expect:

  1. Ammonia loss and yellow mould
  2. A cooler heap
  3. Slower fermentation
  4. No change
See the answer and why

Ammonia loss and yellow mould Above 1.75 per cent the ratio is wrong and Sepedonium follows.

Compost, step by step50

Formulation

Pause and recall

Check your understanding

Choose your answer before opening the explanation. This is a learning exercise, not a competency assessment.

An old published formula lists BHC. You should:

  1. Leave it out; it is banned in India
  2. Use half
  3. Substitute any insecticide
  4. Use it in Phase I only
See the answer and why

Leave it out; it is banned in India BHC or lindane is a banned organochlorine in India.

Compost, step by step51

Water & Moisture

Chapter opening

Water & Moisture

Most failed compost in India is not short of nitrogen. It is either drowned or thirsty, and nobody measured which.

  • By the end you can say how much water pre-wetting takes and how long.
  • By the end you can name the moisture target at each stage.
  • By the end you can test moisture by squeeze and by drying.
Compost, step by step54

Water & Moisture

Field notes

Pre-wetting is the first control point

Dry straw will not ferment. DMR wets straw on a platform for 24 to 48 hours until it reaches about 75 per cent moisture, and puts the water requirement at around 4000 litres per tonne of raw material. Run the leachate back over the heap instead of letting it drain away, because it carries nutrients with it.

Straw takes water slowly. A single soaking on the morning of stacking wets the outside and leaves the middle of each bale dry, and that dry core never joins the process. Give pre-wetting its own day in the schedule.

Compost, step by step55

Water & Moisture

Field notes

One number per stage

Moisture is not a single target. DMR reports about 72 to 75 per cent at the end of Phase I, when drops appear between the fingers on squeezing, and 64 to 66 per cent after Phase II, when no liquid oozes even on firm squeezing.

Long method compost at spawning is different again: 68 to 72 per cent for synthetic compost and 65 to 67 per cent where horse manure was used. The farmer folder gives 68 to 70 per cent on the squeeze test on day 28. Always say which compost and which stage before quoting a moisture figure.

Compost, step by step56

Water & Moisture

Field notes

How to measure it

The squeeze test is quick. Take a fistful, close the hand hard and read what happens: free running water means too wet, several drops between the fingers is Phase I level, a damp mass with no liquid is Phase II level.

If you have a balance, dry a known weight of compost until it stops losing weight and calculate the loss as a percentage. That is a real number, and it is the one to write down.

  • Sample five points: both ends, both sides, centre.
  • Take each sample from inside, not the dry surface.
  • Use the same points every batch so readings compare.
Compost, step by step57

Water & Moisture

Field notes

Too wet and too dry

Above 72 per cent at spawning, DMR reports that aeration fails, anaerobic conditions can kill the mushroom mycelium, and brown and white plaster moulds appear. Wet compost is also heavy and packs down, which blocks the air a blower is paid to deliver.

Dry compost fails the other way. NHB, reproducing ICAR guidance, links compost below 64 per cent moisture, under a wet casing layer, to weeper mushrooms. Correct water at a turning, where it can be mixed in, rather than pouring it on a filled bed later. Both faults cost the crop, and both are cheaper to prevent than to repair.

Compost, step by step58

Water & Moisture

Compare the evidence

Read the numbers in context

These figures belong to the named source and method. Historical costs are not current quotations. A value without its stage, material basis or measurement location is not a farm instruction.

Source-specific reference figures
What is measuredValue and basisSource and limitation
Pre-wetting duration24-48 hoursICAR-DMR manual, 2011. on a platform, leachate recycled
Moisture after pre-wetting75 %ICAR-DMR manual, 2011. target to reach before stacking
Compost, step by step59

Water & Moisture

Compare the evidence

Read the numbers in context

These figures belong to the named source and method. Historical costs are not current quotations. A value without its stage, material basis or measurement location is not a farm instruction.

Source-specific reference figures
What is measuredValue and basisSource and limitation
Moisture at end of Phase I72-75 %ICAR-DMR manual, 2011. drops appear between the fingers
Moisture after Phase II64-66 %ICAR-DMR manual, 2011. no liquid oozes on firm squeezing
Compost, step by step60

Water & Moisture

Compare the evidence

Read the numbers in context

These figures belong to the named source and method. Historical costs are not current quotations. A value without its stage, material basis or measurement location is not a farm instruction.

Source-specific reference figures
What is measuredValue and basisSource and limitation
Ceiling at spawning72 %ICAR-DMR manual, 2011. above this, poor aeration and plaster moulds
Floor linked to weepers64 %NHB DPR model, 2018. dry compost under a wet casing
Compost, step by step61

Water & Moisture

Practical workbook

Build a moisture log for one batch

Record: Date, stage, reading at each point, dried sample percentage, litres added and the position.

  1. Mark five fixed sampling points on the stack and number them.

  2. Squeeze test each point at stacking and at every turning.

  3. Dry one combined sample per turning and record the percentage.

  4. Compare each reading with that stage target before adding water.

  5. Note how much water you added and where.

Compost, step by step62

Water & Moisture

Pause and recall

Avoid these mistakes

  • Quoting one moisture figure for the whole crop; the target changes every stage.
  • Sampling the dry outer skin, then adding water the inside did not need.
  • Watering a filled bed; it runs down the sides instead of mixing.
Compost, step by step63

Water & Moisture

Pause and recall

Check your understanding

Choose your answer before opening the explanation. This is a learning exercise, not a competency assessment.

No liquid oozes on a firm squeeze. This matches:

  1. After Phase II, 64 to 66 per cent
  2. End of Phase I
  3. After pre-wetting
  4. Too dry to use
See the answer and why

After Phase II, 64 to 66 per cent Phase I compost still releases drops between the fingers.

Compost, step by step64

Water & Moisture

Pause and recall

Check your understanding

Choose your answer before opening the explanation. This is a learning exercise, not a competency assessment.

Compost at 75 per cent moisture at spawning is likely to:

  1. Go anaerobic and grow plaster moulds
  2. Pin earlier
  3. Dry itself safely
  4. Raise the pH
See the answer and why

Go anaerobic and grow plaster moulds DMR sets 72 per cent as the ceiling for aeration.

Compost, step by step65

Water & Moisture

Pause and recall

Check your understanding

Choose your answer before opening the explanation. This is a learning exercise, not a competency assessment.

The safest time to correct low moisture is:

  1. At a turning
  2. After filling beds
  3. After pasteurisation
  4. At spawning
See the answer and why

At a turning Water only mixes while the mass is being turned.

Compost, step by step66

Water & Moisture

Visual glossary

Words used in this lesson

Pre-wetting
See related figure: Connect structure with the process

Soaking straw before stacking so water reaches inside every bale.

Leachate

Brown water draining from a wet heap; recycling it returns nutrients.

Squeeze test
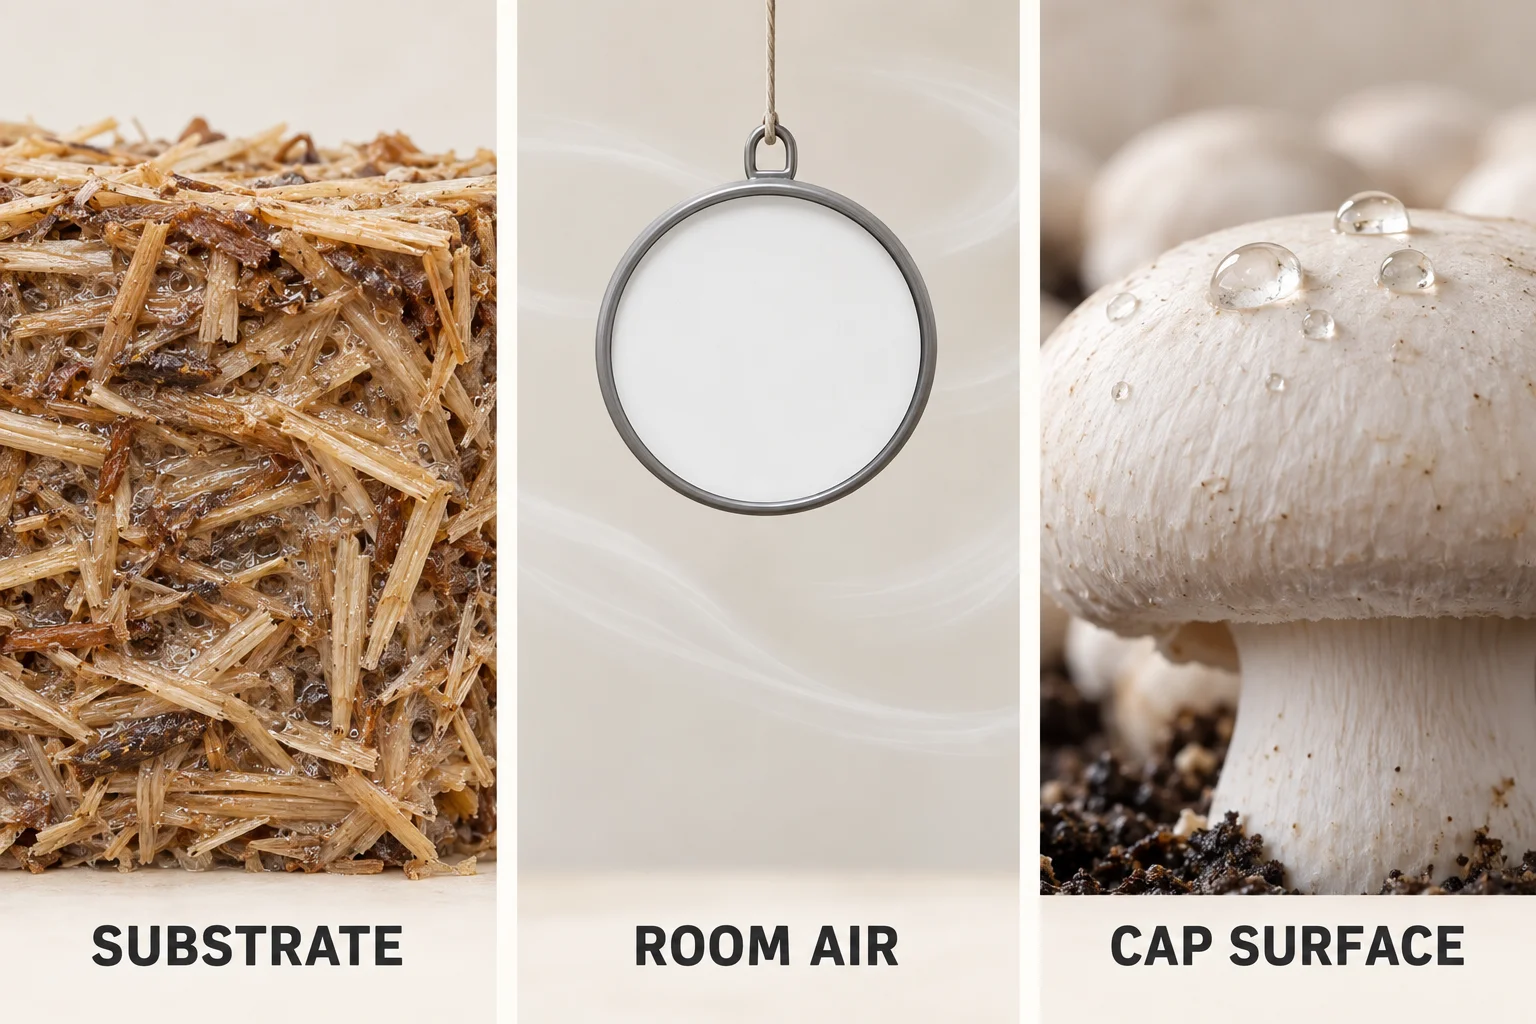
Generated comparison of growing-material moisture, room-air measurement and cap-surface water.
AI illustration · details

AI teaching illustration. These are different observations, not moisture targets or an instruction to wet the crop.

Open full image ↗

Judging moisture by the water appearing when a fistful is pressed.

Compost, step by step67

Microbiology

Chapter opening

Microbiology

Nobody heats a compost heap. The microbes do, and the thermometer on the stack is really a report on how well they are being fed.

  • By the end you can explain heat in a heap as microbial output, not input.
  • By the end you can say what selective compost means and which stage builds it.
  • By the end you can read temperature, smell and weight loss as evidence.
Compost, step by step69

Microbiology

Field notes

Who does the work

Composting is a relay. Mesophilic organisms, which live at everyday temperatures, start on the easy sugars as soon as straw is wet and nitrogen is available. Their own heat then pushes them out and hands the heap to thermophilic bacteria, fungi and actinomycetes, which prefer high temperatures and break down tougher material.

That is why a heap which will not heat is a feeding problem, not a heating problem. DMR notes that when nitrogen is kept below 1.5 per cent the heap may not pass 55 to 60 degrees Celsius, because there is too little microbial activity to make the heat.

Compost, step by step70

Microbiology

Field notes

Heat is the meter reading

In the long method the heap rises quickly and may reach 70 degrees Celsius within 24 to 48 hours. The DMR farmer folder describes 65 to 70 degrees in two or three days and calls it a good sign.

There is an upper limit. DMR states that above 80 degrees in the central core is not desirable, because the core goes anaerobic and the friendly thermophilic flora is lost. A heap hot in the middle and cold at the edges is not composting evenly; it is two heaps in one, and the turning schedule exists to swap them.

Compost, step by step71

Microbiology

Field notes

Selectivity is the point

Good compost is not just rotted straw. It is food that Agaricus bisporus can use and most of its competitors cannot. That selectivity is built in Phase II, where thermophilic organisms take up the free ammonia and lock it into their own bodies as microbial protein.

DMR keeps the mass at 45 to 52 degrees Celsius for that conversion, and warns against conditioning below 40 degrees because mesophilic fungi set in and make the compost unsuitable. The conditioning band is not comfort; it is the range where useful organisms beat the others.

Compost, step by step72

Microbiology

Field notes

What the biology costs

Microbial work burns material. DMR reports about 30 per cent weight loss in Phase I and a further 20 to 25 per cent in Phase II. The carbon to nitrogen ratio falls from 25 to 30 at stacking to around 16 to 1, and nitrogen per cent rises as carbon leaves as carbon dioxide.

This is why finished compost weighs far less than the straw you bought, and why nitrogen readings climb without anyone adding nitrogen. Expect the loss, plan for it, and do not read a rising nitrogen figure as proof of supplementation.

Compost, step by step73

Microbiology

Compare the evidence

Read the numbers in context

These figures belong to the named source and method. Historical costs are not current quotations. A value without its stage, material basis or measurement location is not a farm instruction.

Source-specific reference figures
What is measuredValue and basisSource and limitation
Peak heap temperature70 °CICAR-DMR manual, 2011. long method, within 24 to 48 hours
Core temperature ceiling80 °CICAR-DMR manual, 2011. above this the core goes anaerobic
Compost, step by step74

Microbiology

Compare the evidence

Read the numbers in context

These figures belong to the named source and method. Historical costs are not current quotations. A value without its stage, material basis or measurement location is not a farm instruction.

Source-specific reference figures
What is measuredValue and basisSource and limitation
Conditioning band45-52 °CICAR-DMR manual, 2011. optimum for thermophilic flora in Phase II
Conditioning floor40 °CICAR-DMR manual, 2011. below this mesophilic fungi set in
Compost, step by step75

Microbiology

Compare the evidence

Read the numbers in context

These figures belong to the named source and method. Historical costs are not current quotations. A value without its stage, material basis or measurement location is not a farm instruction.

Source-specific reference figures
What is measuredValue and basisSource and limitation
Weight loss30 in Phase I, 20-25 in Phase II %ICAR-DMR manual, 2011. short method of composting
Compost, step by step76

Microbiology

Practical workbook

Plot one heap instead of spot checking it

Record: Date, hour, three probe readings, turning dates, and any smell change such as sharp ammonia.

  1. Fix three probe points: core, mid depth and edge.

  2. Read all three at the same hour every day.

  3. Draw the three lines on one sheet of graph paper.

  4. Mark each turning and watch how fast heat returns.

  5. Flag any core reading above 80 degrees the same day.

Compost, step by step77

Microbiology

Pause and recall

Avoid these mistakes

  • Treating a cold heap as a thermometer fault instead of checking nitrogen and water.
  • Letting the core pass 80 degrees and calling it a strong heap.
  • Conditioning below 40 degrees to save fuel, which lets mesophilic fungi in.
Compost, step by step78

Microbiology

Pause and recall

Check your understanding

Choose your answer before opening the explanation. This is a learning exercise, not a competency assessment.

A heap has not crossed 50 degrees after three days. Suspect:

  1. Too little nitrogen in the mix
  2. A fast thermometer
  3. Too much gypsum
  4. Too many turnings
See the answer and why

Too little nitrogen in the mix DMR links weak heating to nitrogen below 1.5 per cent.

Compost, step by step79

Microbiology

Pause and recall

Check your understanding

Choose your answer before opening the explanation. This is a learning exercise, not a competency assessment.

Holding compost at 45 to 52 degrees is meant to:

  1. Convert ammonia into microbial protein
  2. Dry the compost
  3. Kill all organisms
  4. Raise the pH
See the answer and why

Convert ammonia into microbial protein That conversion is what makes compost selective for Agaricus.

Compost, step by step80

Microbiology

Pause and recall

Check your understanding

Choose your answer before opening the explanation. This is a learning exercise, not a competency assessment.

Phase I loses about 30 per cent of its weight because:

  1. Microbes burn carbon and release it as gas
  2. Water is squeezed out
  3. Gypsum dissolves
  4. Straw is removed
See the answer and why

Microbes burn carbon and release it as gas Carbon leaves as carbon dioxide, so nitrogen per cent rises.

Compost, step by step81

Microbiology

Visual glossary

Words used in this lesson

Mesophile

An organism growing at everyday temperatures, roughly 20 to 40 degrees Celsius.

Thermophile
See related figure: Connect structure with the process

An organism growing best above roughly 45 degrees Celsius.

Selective compost

Compost that feeds the mushroom well and its competitors poorly.

Actinomycetes

Thread like bacteria that give good compost its grey white patches.

Compost, step by step82

Phase I

Chapter opening

Phase I

Phase I is the noisy, smelly, outdoor half of composting. Everything Phase II can do is decided by how well this half was run.

  • By the end you can choose between the long, short and indoor routes.
  • By the end you can build a stack of the right size for your region.
  • By the end you can recognise the end of Phase I from its readings.
Compost, step by step84

Phase I

Field notes

Three routes, three timetables

ICAR-DMR publishes three ways to make button mushroom compost. The long method takes 28 to 30 days with 7 to 8 turnings and needs no pasteurisation room. The short method takes 16 to 20 days in total, of which 10 to 12 days are outdoor Phase I. The indoor method runs 10 to 12 days in total, with only 6 to 8 days of Phase I inside an aerated bunker.

The route also changes what the straw gives back. DMR reports 1.75 to 2.0 tonnes of finished compost per tonne of straw by the long method, and 3.0 to 3.5 tonnes by the indoor method.

Compost, step by step85

Phase I

Field notes

Building the stack

Stack on a clean cemented yard so leachate can be collected and returned. Stack size is set by climate, not by convenience. In the plains DMR recommends a stack about 100 to 120 cm wide and around the same height. In the hills, where outside air may sit between 7 and 20 degrees Celsius, the stack is widened to 130 to 150 cm with a height of about 150 cm so heat is not lost.

Keep the sides vertical and the top flat, press the edges lightly, leave the core loose, and never stack less than 300 kg.

Compost, step by step86

Phase I

Field notes

Turning is the process

A turning mixes the hot core with the cool edges, lets fresh air in, and re-wets what has dried. The DMR long method schedule gives turnings on days 6, 10, 13, 16, 19, 22 and 25, with filling on day 28, and gypsum going in at the third turning. The Hindi farmer folder prints an eight turning version of the same ladder.

Both DMR documents also call for an insecticide at the last turning, and they differ from each other by a factor of ten on strength. Copy neither. Check what is approved for this use today and follow that label.

Compost, step by step87

Phase I

Field notes

Knowing Phase I is over

Phase I compost is not finished compost. DMR describes it as dark brown, smelling heavily of ammonia, holding 72 to 75 per cent moisture, with pH roughly 8.2 to 8.5, nitrogen between 1.5 and 2.0 per cent and free ammonia around 800 to 1000 ppm.

That ammonia is the point. It is exactly what Phase II has to convert, and compost handed over with too little of it has already lost nitrogen to the air. If the smell is weak and the pH low, look back at the formula rather than pushing on.

Compost, step by step88

Phase I

Compare the evidence

Read the numbers in context

These figures belong to the named source and method. Historical costs are not current quotations. A value without its stage, material basis or measurement location is not a farm instruction.

Source-specific reference figures
What is measuredValue and basisSource and limitation
Long method duration28-30 daysICAR-DMR manual, 2011. with 7 to 8 turnings
Phase I in a bunker6-8 daysICAR-DMR manual, 2011. against 10 to 12 days outdoors
Compost, step by step89

Phase I

Compare the evidence

Read the numbers in context

These figures belong to the named source and method. Historical costs are not current quotations. A value without its stage, material basis or measurement location is not a farm instruction.

Source-specific reference figures
What is measuredValue and basisSource and limitation
Stack width in the plains100-120 cmICAR-DMR manual, 2011. hills use 130 to 150 cm
pH at the end of Phase I8.2-8.5 pHICAR-DMR manual, 2011. with a very heavy ammonia smell
Compost, step by step90

Phase I

Compare the evidence

Read the numbers in context

These figures belong to the named source and method. Historical costs are not current quotations. A value without its stage, material basis or measurement location is not a farm instruction.

Source-specific reference figures
What is measuredValue and basisSource and limitation
Free ammonia at the end of Phase I800-1000 ppmICAR-DMR manual, 2011. this is what Phase II converts
Compost per tonne of straw1.75-2.0 tonnesICAR-DMR manual, 2011. long method; indoor gives 3.0 to 3.5
Compost, step by step91

Phase I

Practical workbook

Write the turning calendar before you stack

Record: Stacking date, route, stack dimensions, each turning date with core temperature before turning, and end readings.

  1. Pick the route and count days from stacking day zero.

  2. Write every turning date on a board in the yard.

  3. Mark the gypsum turning so it is not missed or doubled.

  4. Measure stack width and height after stacking and correct it.

  5. On the last day record pH, moisture and ammonia smell.

Compost, step by step92

Phase I

Pause and recall

Avoid these mistakes

  • Skipping a turning because the heap looks fine; the edges never joined in.
  • Stacking on bare soil, which loses leachate and invites pests.
  • Copying an insecticide strength from a bulletin; two DMR documents differ tenfold.
Compost, step by step93

Phase I

Pause and recall

Check your understanding

Choose your answer before opening the explanation. This is a learning exercise, not a competency assessment.

In the DMR long method schedule, gypsum goes in at:

  1. The third turning
  2. Stacking
  3. The last turning
  4. Filling day
See the answer and why

The third turning The manual adds gypsum on day 13, the third turning.

Compost, step by step94

Phase I

Pause and recall

Check your understanding

Choose your answer before opening the explanation. This is a learning exercise, not a competency assessment.

A hill farm at 10 degrees Celsius should build the stack:

  1. Wider, 130 to 150 cm
  2. Narrower than the plains
  3. Flat and spread out
  4. Same as the plains
See the answer and why

Wider, 130 to 150 cm A wider stack holds heat when outside air is cold.

Compost, step by step95

Phase I

Pause and recall

Check your understanding

Choose your answer before opening the explanation. This is a learning exercise, not a competency assessment.

A strong ammonia smell at the end of Phase I means:

  1. Normal; Phase II must convert it
  2. The batch is spoiled
  3. Too much gypsum
  4. Ready to spawn
See the answer and why

Normal; Phase II must convert it DMR records 800 to 1000 ppm ammonia here as expected.

Compost, step by step96

Bunker Operation

Chapter opening

Bunker Operation

A bunker turns Phase I from a weather problem into a machine problem. The machine only works if air actually gets through the compost.

  • By the end you can describe the air path from fan to plenum to compost.
  • By the end you can say how fill condition changes where air goes.
  • By the end you can build a monitoring routine instead of trusting one probe.
Compost, step by step99

Bunker Operation

Field notes

What a bunker is

A Phase I bunker is a walled concrete box with an aerated floor. A fan pushes air into a space under the floor, called the plenum, and the air rises through slots into the compost above. A timer runs the fan in cycles so the mass stays aerobic without being cooled too far.

The gain is time and control. DMR completes Phase I in a bunker in 6 to 8 days against 10 to 12 outdoors, and the whole indoor route runs 10 to 12 days. MIDH treats the Phase I bunker as one line inside a compost making unit costed at 30 lakh rupees.

Compost, step by step100

Bunker Operation

Field notes

Fill condition decides where air goes

Air is lazy. It leaves by whichever route has least resistance, so an uneven fill quietly starves part of the batch. A corner packed tight by a loader bucket stays cold and wet. A dip in the surface becomes a chimney, and air races out of it without touching the compost beside it.

Fill evenly, keep the surface level, and do not press the mass against the walls. Material wetter than planned will settle and compact on its own, so wet batches need more care with fill height, not more fan speed.

Compost, step by step101

Bunker Operation

Field notes

Airflow, timers and what DMR specifies

The one airflow figure DMR gives for Phase I is 10 to 15 cubic metres of air per tonne of wet compost per hour through the stack. That is delivered air, not the number printed on the fan.

DMR does not publish a bunker fill height, a plenum pressure or a timer cycle for Indian bunkers, so those must be established on your own farm and written down. Start from the supplier's commissioning settings, change one thing at a time, and keep the batch record that lets you compare one run with the next.

Compost, step by step102

Bunker Operation

Field notes

Monitoring, not spot checking

One probe in the middle tells you about the middle. Build a fixed grid instead: readings near each wall, in the centre, at two depths, taken at the same hours every day.

What you are looking for is spread, not a single value. A wide spread means air is not reaching everywhere, and the fix is usually the fill or a blocked floor slot rather than the fan. Use your nose as a second instrument: sharp ammonia is normal in Phase I, while a sour or rotten egg smell says a pocket has gone anaerobic.

Compost, step by step103

Bunker Operation

Compare the evidence

Read the numbers in context

These figures belong to the named source and method. Historical costs are not current quotations. A value without its stage, material basis or measurement location is not a farm instruction.

Source-specific reference figures
What is measuredValue and basisSource and limitation
Phase I in a bunker6-8 daysICAR-DMR manual, 2011. timer controlled aeration
Indoor method, total10-12 daysICAR-DMR manual, 2011. bunker Phase I plus Phase II
Compost, step by step104

Bunker Operation

Compare the evidence

Read the numbers in context

These figures belong to the named source and method. Historical costs are not current quotations. A value without its stage, material basis or measurement location is not a farm instruction.

Source-specific reference figures
What is measuredValue and basisSource and limitation
Air through the stack10-15 m3 per tonne wet compost per hourICAR-DMR manual, 2011. delivered air, not fan rating
Compost per tonne of straw, indoor3.0-3.5 tonnesICAR-DMR manual, 2011. long method gives 1.75 to 2.0
Compost, step by step105

Bunker Operation

Compare the evidence

Read the numbers in context

These figures belong to the named source and method. Historical costs are not current quotations. A value without its stage, material basis or measurement location is not a farm instruction.

Source-specific reference figures
What is measuredValue and basisSource and limitation
MIDH compost unit norm30 lakh rupees per unitMIDH guidelines, 2025. bunker and tunnel are lines inside it
Compost, step by step106

Bunker Operation

Practical workbook

Map the air path in your own bunker

Record: Batch number, fill height, timer cycle, six probe readings twice daily, slot condition and any smell.

  1. Draw the bunker: fan, plenum, floor slots, compost, exhaust.

  2. Mark six probe positions and number them permanently.

  3. Record all six at the same two hours daily.

  4. After emptying, clear every floor slot before refilling.

  5. Write down the fill height and timer cycle actually used.

Compost, step by step107

Bunker Operation

Pause and recall

Avoid these mistakes

  • Raising fan speed to fix a cold corner instead of fixing the fill.
  • Leaving floor slots blocked between batches, so the plenum feeds part of the floor.
  • Trusting a single centre probe and recording it as the batch temperature.
Compost, step by step108

Bunker Operation

Pause and recall

Check your understanding

Choose your answer before opening the explanation. This is a learning exercise, not a competency assessment.

The plenum in a bunker is:

  1. The air space below the floor
  2. The compost surface
  3. The exhaust duct
  4. The fan housing
See the answer and why

The air space below the floor Air is pushed into it and rises through the floor slots.

Compost, step by step109

Bunker Operation

Pause and recall

Check your understanding

Choose your answer before opening the explanation. This is a learning exercise, not a competency assessment.

One corner stays cold. The most likely cause is:

  1. Compost compacted there, so air bypasses it
  2. An undersized fan
  3. Too much gypsum
  4. A long timer cycle
See the answer and why

Compost compacted there, so air bypasses it Air follows least resistance, so this is a fill problem.

Compost, step by step110

Bunker Operation

Pause and recall

Check your understanding

Choose your answer before opening the explanation. This is a learning exercise, not a competency assessment.

DMR gives Phase I airflow as:

  1. 10 to 15 m3 per tonne wet compost per hour
  2. 10 to 15 m3 per hour total
  3. Whatever the fan plate says
  4. Not specified
See the answer and why

10 to 15 m3 per tonne wet compost per hour The figure is per tonne of wet compost, through the stack.

Compost, step by step111

Bunker Operation

Visual glossary

Words used in this lesson

Bunker

A walled concrete box with an aerated floor used for indoor Phase I.

Plenum
See related figure: Distinguish Phase II objectives

The sealed air space under the floor that feeds the slots evenly.

Anaerobic pocket

A part of the mass with no oxygen; it smells sour and spoils.

Compost, step by step112

Aeration

Chapter opening

Aeration

The number on the fan plate is what the fan can do against nothing. What reaches your compost is a different number, and only one of them makes compost.

  • By the end you can explain why rated fan capacity is not delivered air.
  • By the end you can state the oxygen and airflow figures DMR publishes.
  • By the end you can collect distribution evidence before changing equipment.
Compost, step by step114

Aeration

Field notes

Rated air and delivered air

A fan is rated at a test condition with nothing in its way. In a real bunker or tunnel the air must pass through a plenum, a slotted floor and one to two metres of damp compost. Each of those adds resistance, and the fan moves less air as resistance rises.

The figure that matters is air passing through the stack. DMR states 10 to 15 cubic metres of air per tonne of wet compost per hour for aerated Phase I. Work out what your batch weighs, multiply, and compare that with what the system is actually delivering before blaming the compost.

Compost, step by step115

Aeration

Field notes

Oxygen is the real target

Air is the means; oxygen is the purpose. DMR asks for oxygen above 10 per cent by volume during Phase II conditioning so the mass stays fully aerobic, and notes demand can climb above 15 per cent of the total gaseous volume during post pasteurisation conditioning.

When oxygen falls the process does not simply slow, it changes. Anaerobic pockets make sour smelling compounds and kill the thermophilic flora. DMR links olive green mould directly to lack of aeration during compost preparation, especially during Phase II, alongside temperatures above 60 degrees.

Compost, step by step116

Aeration

Field notes

Evidence of distribution

Distribution is measured with temperature, because temperature follows the air. DMR sets the limit in a Phase II tunnel plainly: the difference between air above the compost, the compost itself and the plenum below should not exceed 3 degrees Celsius.

Use a grid of probes and compare readings against each other rather than against a setpoint.

  • Steam rising evenly across the surface, not from two spots.
  • No cold zone near the walls or the door end.
  • Probe spread inside the limit at every reading hour.
  • No sour smell anywhere along the surface.
Compost, step by step117

Aeration

Field notes

Acting on the evidence

When the spread is wide, the cause is usually mechanical and cheap to fix. Look first at compaction from the loader, then at a dip in the surface, then at floor slots blocked by old compost, then at air escaping round a door seal instead of going through the mass.

Raising fan speed on a leaking or compacted system simply moves more air along the easy path and dries the surface. Change one thing, run one batch, record what the spread did. A bigger fan bought without this evidence usually solves nothing.

Compost, step by step118

Aeration

Compare the evidence

Read the numbers in context

These figures belong to the named source and method. Historical costs are not current quotations. A value without its stage, material basis or measurement location is not a farm instruction.

Source-specific reference figures
What is measuredValue and basisSource and limitation
Air through the stack10-15 m3 per tonne wet compost per hourICAR-DMR manual, 2011. aerated Phase I, delivered air
Oxygen during conditioning10 % and aboveICAR-DMR manual, 2011. keeps the mass fully aerobic
Compost, step by step119

Aeration

Compare the evidence

Read the numbers in context

These figures belong to the named source and method. Historical costs are not current quotations. A value without its stage, material basis or measurement location is not a farm instruction.

Source-specific reference figures
What is measuredValue and basisSource and limitation
Peak oxygen demand15 % of gaseous volumeICAR-DMR manual, 2011. during post pasteurisation conditioning
Maximum temperature spread3 °CICAR-DMR manual, 2011. between air, compost and plenum
Compost, step by step120

Aeration

Compare the evidence

Read the numbers in context

These figures belong to the named source and method. Historical costs are not current quotations. A value without its stage, material basis or measurement location is not a farm instruction.

Source-specific reference figures
What is measuredValue and basisSource and limitation
Core temperature ceiling80 °CICAR-DMR manual, 2011. above this the core turns anaerobic
Compost, step by step121

Aeration

Practical workbook

Test distribution on the next batch

Record: Batch tonnage, computed air requirement, probe readings by position and hour, widest spread and its cause.

  1. Weigh the compost loaded and write the tonnage down.

  2. Place probes near both walls, both ends and centre.

  3. Log every probe at the same three hours daily.

  4. Walk the surface and note steam pattern and smell.

  5. List the widest spread and where it came from.

Compost, step by step122

Aeration

Pause and recall

Avoid these mistakes

  • Writing the fan plate figure in a batch record as though it were delivered air.
  • Buying a larger blower before checking compaction, slots and door seals.
  • Reading one probe, which hides the spread that would show the problem.
Compost, step by step123

Aeration

Pause and recall

Check your understanding

Choose your answer before opening the explanation. This is a learning exercise, not a competency assessment.

A fan rated 8000 cubic metres per hour, loaded, delivers:

  1. Less, because compost adds resistance
  2. Exactly 8000
  3. More, helped by the plenum
  4. The same as empty
See the answer and why

Less, because compost adds resistance Rated capacity is measured against no resistance at all.

Compost, step by step124

Aeration

Pause and recall

Check your understanding

Choose your answer before opening the explanation. This is a learning exercise, not a competency assessment.

DMR limits the air, compost and plenum difference to:

  1. 3 degrees Celsius
  2. 10 degrees Celsius
  3. 1 degree Celsius
  4. No limit given
See the answer and why

3 degrees Celsius A wider spread means air is missing part of the mass.

Compost, step by step125

Aeration

Pause and recall

Check your understanding

Choose your answer before opening the explanation. This is a learning exercise, not a competency assessment.

Poor aeration in Phase II is linked by DMR to:

  1. Olive green mould
  2. Weeper mushrooms
  3. Bacterial blotch
  4. False truffle only
See the answer and why

Olive green mould Its table names poor Phase II aeration and heat above 60 degrees.

Compost, step by step126

Aeration

Visual glossary

Words used in this lesson

Rated capacity

Airflow a fan achieves on a test bench with nothing resisting it.

Delivered air

Air that actually passes through the compost in the working system.

Short circuit

Air escaping by an easy route without doing any work.

Compost, step by step127

Phase II

Chapter opening

Phase II

Phase II is four jobs done in one room, in one order, with the door shut. Getting the order wrong costs the whole batch.

  • By the end you can list the four stages with their temperature and time.
  • By the end you can explain why heating and cooling rates are controlled.
  • By the end you can state what must be true before compost leaves the tunnel.
Compost, step by step129

Phase II

Field notes

The four stages in order

Filling and levelling comes first. The blower runs until compost, plenum and the air above sit at roughly one temperature, around 45 to 48 degrees Celsius, which takes about four to five hours.

Then pre pasteurisation conditioning holds the mass between 45 and 52 degrees for two days. Pasteurisation follows at 58 to 59 degrees for 4 to 6 hours. Last comes post pasteurisation conditioning at 45 to 48 degrees for 3 to 4 days, until ammonia is no longer detectable. Smaller tunnels often need 4 to 5 days to reach the same point.

Compost, step by step130

Phase II

Field notes

Filling the tunnel

DMR fills a bulk chamber to a height of 2 to 2.2 metres, loaded so one square metre of tunnel floor carries about 900 to 1000 kg of compost. An even fill at that loading is what lets one blower serve the whole mass.

A deeper fill on the same floor raises resistance and the bottom compacts under its own weight. A shallow patch becomes the easy path for air. Level the surface by hand after the loader has finished, and check the height at several points rather than one.

Compost, step by step131

Phase II

Field notes

Rates, not only setpoints

How fast you move between stages matters as much as where you stop. DMR narrows the dampers and lets the compost heat itself at roughly 1 degree Celsius per hour, reaching 58 to 59 degrees in about 10 to 12 hours. After the hold, temperature is brought down at about 1.5 degrees per hour into the conditioning band.

Throughout, the difference between air above the compost, the compost and the plenum should not exceed 3 degrees. A fast jump or a sudden drop shows the air is working on one part of the mass only.

Compost, step by step132

Phase II

Field notes

Release boundaries

Compost leaves Phase II on evidence, not on the calendar. DMR describes finished compost as dark brown and sweet smelling, holding 64 to 66 per cent moisture with no liquid oozing on a firm squeeze, and carrying free ammonia below 10 ppm.

Temperature is then brought down gradually to 25 to 30 degrees Celsius before spawning. Expect a further 20 to 25 per cent weight loss across Phase II. If ammonia is still detectable, conditioning continues; spawning into ammonia kills young mycelium and invites moulds that live on the amines left behind.

Compost, step by step133

Phase II

Compare the evidence

Read the numbers in context

These figures belong to the named source and method. Historical costs are not current quotations. A value without its stage, material basis or measurement location is not a farm instruction.

Source-specific reference figures
What is measuredValue and basisSource and limitation
Levelling off after filling45-48 °CICAR-DMR manual, 2011. reached in four to five hours
Pre pasteurisation conditioning45-52 °C for 2 daysICAR-DMR manual, 2011. oxygen held above 10 per cent
Compost, step by step134

Phase II

Compare the evidence

Read the numbers in context

These figures belong to the named source and method. Historical costs are not current quotations. A value without its stage, material basis or measurement location is not a farm instruction.

Source-specific reference figures
What is measuredValue and basisSource and limitation
Pasteurisation58-59 °C for 4-6 hoursICAR-DMR manual, 2011. never above 60 degrees
Post pasteurisation conditioning45-48 °C for 3-4 daysICAR-DMR manual, 2011. smaller tunnels take 4 to 5 days
Compost, step by step135

Phase II

Compare the evidence

Read the numbers in context

These figures belong to the named source and method. Historical costs are not current quotations. A value without its stage, material basis or measurement location is not a farm instruction.

Source-specific reference figures
What is measuredValue and basisSource and limitation
Free ammonia at releasebelow 10 ppmICAR-DMR manual, 2011. no detectable smell of ammonia
Compost temperature at spawning25-30 °CICAR-DMR manual, 2011. brought down gradually after conditioning
Compost, step by step136

Phase II

Practical workbook

Write the run sheet before filling

Record: Fill height and loading, two hourly temperatures at each probe, hold start and end, ammonia checks, release decision.

  1. Draw the four stages with the target band for each.

  2. Note the fill height and kilograms per square metre loaded.

  3. Log compost, air and plenum temperature every two hours.

  4. Start the hold clock when the coldest probe reaches 58 degrees.

  5. Release only after ammonia, moisture and temperature checks pass.

Compost, step by step137

Phase II

Pause and recall

Avoid these mistakes

  • Starting the hold clock on the air reading rather than the coldest compost probe.
  • Ending conditioning by the calendar while ammonia can still be smelled.
  • Filling deeper than the tunnel was designed for, which starves the bottom of air.
Compost, step by step138

Phase II

Pause and recall

Check your understanding

Choose your answer before opening the explanation. This is a learning exercise, not a competency assessment.

The correct order in Phase II is:

  1. Level off, condition, pasteurise, condition again
  2. Pasteurise, level off, condition
  3. Condition, cool, pasteurise
  4. Pasteurise then spawn
See the answer and why

Level off, condition, pasteurise, condition again Conditioning happens both before and after the peak.

Compost, step by step139

Phase II

Pause and recall

Check your understanding

Choose your answer before opening the explanation. This is a learning exercise, not a competency assessment.

DMR fills a bulk tunnel to about:

  1. 900 to 1000 kg per square metre
  2. 300 kg per square metre
  3. 2 tonnes per square metre
  4. Whatever the loader gives
See the answer and why

900 to 1000 kg per square metre That loading at 2 to 2.2 metres is what the blower suits.

Compost, step by step140

Phase II

Pause and recall

Check your understanding

Choose your answer before opening the explanation. This is a learning exercise, not a competency assessment.

Ammonia is faintly detectable on day three of conditioning:

  1. Continue conditioning until it is gone
  2. Release and spawn
  3. Reheat to 58 degrees
  4. Cool quickly to 25 degrees
See the answer and why

Continue conditioning until it is gone Below 10 ppm is a release condition, not a target to hurry.

Compost, step by step141

Pasteurization

Chapter opening

Pasteurization

Pasteurisation is not sterilisation. You are killing pests and weed moulds while deliberately keeping alive the organisms that finish the compost for you.

  • By the end you can state what the heat must kill and what it must spare.
  • By the end you can give the temperature, hold time and upper limit DMR publishes.
  • By the end you can say where the measurement must be taken.
Compost, step by step144

Pasteurization

Field notes

What the heat is for

Compost arriving from Phase I carries fly eggs, mites, nematodes, and the spores of competitor moulds and weed fungi. A controlled heat treatment kills them. It is not meant to kill everything: the thermophilic fungi and bacteria that convert ammonia in the next stage have to survive, or the compost will never become selective.

That is the whole balance of the operation. Too little heat and the competitors ride into the growing room with the compost. Too much and you sterilise away the organisms that make Phase II work at all.

Compost, step by step145

Pasteurization

Field notes

A narrow window

DMR is specific: compost is pasteurised properly when held at 58 to 59 degrees Celsius for 4 to 6 hours. The temperature is reached by narrowing the dampers and letting the mass heat itself at about 1 degree per hour, which takes roughly 10 to 12 hours.

The ceiling is firm. Above 60 degrees, DMR warns, all kinds of organisms are killed, including the thermophilic fungi essential for Phase II. The same manual lists temperature above 60 degrees during pasteurisation, together with poor aeration, as the trigger for olive green mould.

Compost, step by step146

Pasteurization

Field notes

Where you measure decides everything

A hold is only real at the coldest point of the mass. Air temperature in the tunnel reaches the target long before the compost does, and a probe near the door reads differently from one in the middle.

DMR keeps the difference between air, compost and plenum within 3 degrees Celsius, which is itself a check on whether any single probe can be trusted.

  • Probe the compost, never the air, for the hold.
  • Both ends and the centre, at two depths.
  • Start the clock on the coldest probe.
  • Log every probe every hour through the hold.
Compost, step by step147

Pasteurization

Field notes

When there is no steam line

Seasonal growers using long method compost often have no boiler. DMR publishes a chemical alternative applied at the last turning, after which the compost is heaped and covered with a polythene sheet for two days. Products and approvals change, so read the current label before using anything and never scale a published figure yourself.

DMR trial data on that treatment is useful context: 18.1 kg of mushrooms per 100 kg compost against 10.5 kg for a water sprayed control. Casing soil is a separate job, steamed at 60 to 65 degrees for 6 to 8 hours.

Compost, step by step148

Pasteurization

Compare the evidence

Read the numbers in context

These figures belong to the named source and method. Historical costs are not current quotations. A value without its stage, material basis or measurement location is not a farm instruction.

Source-specific reference figures
What is measuredValue and basisSource and limitation
Pasteurisation temperature58-59 °CICAR-DMR manual, 2011. compost temperature, not air
Hold time4-6 hoursICAR-DMR manual, 2011. counted from the coldest compost probe
Compost, step by step149

Pasteurization

Compare the evidence

Read the numbers in context

These figures belong to the named source and method. Historical costs are not current quotations. A value without its stage, material basis or measurement location is not a farm instruction.

Source-specific reference figures
What is measuredValue and basisSource and limitation
Upper limit60 °CICAR-DMR manual, 2011. above this thermophilic fungi are killed
Rate of rise1 °C per hourICAR-DMR manual, 2011. self generated, target in 10 to 12 hours
Compost, step by step150

Pasteurization

Compare the evidence

Read the numbers in context

These figures belong to the named source and method. Historical costs are not current quotations. A value without its stage, material basis or measurement location is not a farm instruction.

Source-specific reference figures
What is measuredValue and basisSource and limitation
Rate of cooling1.5 °C per hourICAR-DMR manual, 2011. down to the 45 to 48 degree band
DMR trial yield range10.5-18.1 kg per 100 kg compostICAR-DMR manual, 2011. water sprayed control against treated compost
Compost, step by step151

Pasteurization

Practical workbook

Prove your hold on the next batch

Record: Probe positions, hourly readings, hold start and end by the coldest probe, excursions and cooling rate.

  1. Place four compost probes: both ends, centre, two depths.

  2. Write the time the coldest probe first reads 58 degrees.

  3. Log all probes hourly and mark anything above 60 degrees.

  4. Stop the hold only after the coldest probe completes its hours.

  5. Record the cooling rate as you move into conditioning.

Compost, step by step152

Pasteurization

Pause and recall

Avoid these mistakes

  • Using the tunnel air reading as proof while the compost core lags behind.
  • Pushing to 62 or 63 degrees for safety, killing the flora Phase II needs.
  • Copying a chemical treatment strength from an old bulletin without checking approval.
Compost, step by step153

Pasteurization

Pause and recall

Check your understanding

Choose your answer before opening the explanation. This is a learning exercise, not a competency assessment.

The hold time is counted from when:

  1. The coldest compost probe reaches 58 degrees
  2. The air reaches 58 degrees
  3. The boiler starts
  4. Any probe hits 60 degrees
See the answer and why

The coldest compost probe reaches 58 degrees Anything colder than the target was never pasteurised.

Compost, step by step154

Pasteurization

Pause and recall

Check your understanding

Choose your answer before opening the explanation. This is a learning exercise, not a competency assessment.

Compost held at 63 degrees for six hours is:

  1. Over treated, thermophilic fungi killed
  2. Better pasteurised
  3. Unchanged
  4. Ready sooner
See the answer and why

Over treated, thermophilic fungi killed Above 60 degrees the organisms Phase II needs are lost.

Compost, step by step155

Pasteurization

Pause and recall

Check your understanding

Choose your answer before opening the explanation. This is a learning exercise, not a competency assessment.

Steaming at 60 to 65 degrees for 6 to 8 hours is DMR guidance for:

  1. Casing soil
  2. Compost pasteurisation
  3. Spawn bottles
  4. Room walls
See the answer and why

Casing soil Compost is held at 58 to 59 degrees instead.

Compost, step by step156

Pasteurization

Visual glossary

Words used in this lesson

Pasteurisation
See related figure: Distinguish Phase II objectives

Controlled heating that kills pests and competitors while sparing useful thermophiles.

Sterilisation

Killing every living thing, which is not what compost needs.

Hold time

How long the coldest part of the mass stays at the target temperature.

Weed fungus
Generated Button mushroom anatomy cutaway.
AI illustration · details

AI teaching illustration. Use the drawing to locate the fruit body and mycelium; not a scale drawing or species-identification key.

Open full image ↗

Any mould competing with the mushroom for the same compost.

Compost, step by step157

Conditioning

Chapter opening

Conditioning

Pasteurisation kills. Conditioning feeds. After the peak, heat loving microbes eat the ammonia that would otherwise kill your spawn, and evidence, not the clock, ends the hold.

  • By the end you can separate the conditioning before pasteurisation from the one after it.
  • By the end you can explain in plain words what happens to the ammonia.
  • By the end you can list the evidence that lets you end the hold.
Compost, step by step159

Conditioning

Field notes

Two conditionings, one purpose

Phase II is not one event. Before the peak the whole mass is held at 45 to 52 °C for about two days. ICAR-DMR calls this pre-pasteurisation conditioning, or PPC. Its job is to grow the thermophilic flora, the heat loving bacteria and actinomycetes that later do the ammonia work.

After pasteurisation the compost is brought down at about 1.5 °C per hour and held at 45 to 48 °C. This is post-pasteurisation conditioning, or POPC. DMR gives 3 to 4 days for a bulk tunnel above 15 tonnes, and 4 to 5 days for a smaller one, or as long as the ammonia takes.

Compost, step by step160

Conditioning

Field notes

Where the ammonia goes

Compost leaving Phase I carries roughly 800 to 1,000 ppm of ammonia and sits at pH 8.2 to 8.5. That ammonia is nitrogen, and it is not thrown away. During conditioning the thermophilic community takes it up and locks it into microbial bodies, which the mushroom later digests. Some also leaves with the exhaust air.

Do not call this one single pathway. Uptake, chemistry and gas loss act together, in shares set by air supply, temperature and the nitrogen the formulation put in. A mix stacked above 1.75 percent nitrogen leaves more ammonia for these days to clear.

Compost, step by step161

Conditioning

Field notes

Oxygen is the quiet input

Conditioning is aerobic work. DMR asks for oxygen above 10 percent inside the compost mass throughout, and notes that demand during PPC can climb higher still. Starve the mass of air and the microbes that eat ammonia slow down while wet airless pockets form.

There is also a floor. Below 40 °C mesophilic fungi, the ordinary moulds of a warm room, move in and the compost becomes unsuitable for mushroom growth. Low and slow is not a safe way to stretch conditioning. If the mass is drifting down, correct the air circuit rather than add days.

Compost, step by step162

Conditioning

Field notes

Knowing when it is finished

The end point is a condition, not a date. DMR ends POPC when there is no detectable ammonia, which it places below 10 ppm. Collect that evidence at several points while the compost is still in the band, using a declared safe method, never by breathing tunnel air.

Read it with everything else: compost temperature steady in the band and not drifting, white actinomycete flecks through the whole mass rather than one layer, a sweet smell in place of a sharp one, and no wet airless pockets. If two of those disagree with the ammonia test, investigate before release.

Compost, step by step163

Conditioning

Compare the evidence

Read the numbers in context

These figures belong to the named source and method. Historical costs are not current quotations. A value without its stage, material basis or measurement location is not a farm instruction.

Source-specific reference figures
What is measuredValue and basisSource and limitation
Pre-pasteurisation conditioning45 to 52 °CICAR-DMR manual, 2011. Two days before the peak, oxygen above 10 percent
Cooling rate after the peak1.5 °C per hourICAR-DMR manual, 2011. Down to the 45 to 48 °C holding band
Compost, step by step164

Conditioning

Compare the evidence

Read the numbers in context

These figures belong to the named source and method. Historical costs are not current quotations. A value without its stage, material basis or measurement location is not a farm instruction.

Source-specific reference figures
What is measuredValue and basisSource and limitation
POPC duration, bulk tunnel3 to 4 daysICAR-DMR manual, 2011. Above 15 tonnes; smaller tunnels 4 to 5 days
Conditioning floor40 °CICAR-DMR manual, 2011. Below this mesophilic fungi set in
Compost, step by step165

Conditioning

Compare the evidence

Read the numbers in context

These figures belong to the named source and method. Historical costs are not current quotations. A value without its stage, material basis or measurement location is not a farm instruction.

Source-specific reference figures
What is measuredValue and basisSource and limitation
Ammonia at the end of Phase IIbelow 10 ppmICAR-DMR manual, 2011. The nose cannot read below this level
Compost, step by step166

Conditioning

Practical workbook

Map one conditioning hold

Record: Batch number, hold hours, every reading with its point, and why you ended the hold.

  1. Write down tunnel size and expected batch output in tonnes before filling.

  2. Log compost temperature at three depths, three times a day, through the hold.

  3. Test ammonia at three fixed points with a declared safe method, not by smell.

  4. Mark each hour the mass leaves the 45 to 48 °C band and what you changed.

Compost, step by step167

Conditioning

Pause and recall

Avoid these mistakes

  • Adding days when ammonia will not clear, instead of checking oxygen and air distribution.
  • Ending conditioning on smell alone, when the nose cannot read below 10 ppm.
  • Letting the mass drift under 40 °C overnight, which invites moulds into a finished batch.
Compost, step by step168

Conditioning

Pause and recall

Check your understanding

Choose your answer before opening the explanation. This is a learning exercise, not a competency assessment.

Conditioning is kept above 40 °C mainly because:

  1. Mesophilic fungi invade below that point
  2. Spawn dies below it
  3. Ammonia freezes below it
  4. Gypsum stops working below it
See the answer and why

Mesophilic fungi invade below that point DMR warns that mesophilic fungi set in below 40 °C.

Compost, step by step169

Conditioning

Pause and recall

Check your understanding

Choose your answer before opening the explanation. This is a learning exercise, not a competency assessment.

Ammonia at the end of Phase I is about:

  1. 8 to 10 ppm
  2. 80 to 100 ppm
  3. 800 to 1,000 ppm
  4. 8,000 ppm
See the answer and why

800 to 1,000 ppm DMR gives 800 to 1,000 ppm after Phase I. Ten ppm is the spawning limit.

Compost, step by step170

Conditioning

Pause and recall

Check your understanding

Choose your answer before opening the explanation. This is a learning exercise, not a competency assessment.

You may end POPC when:

  1. Four days have passed
  2. The door smells sweet
  3. Ammonia at several points is below 10 ppm and temperatures are steady
  4. The fan ran all night
See the answer and why

Ammonia at several points is below 10 ppm and temperatures are steady DMR ties the end point to residual ammonia, not to elapsed time.

Compost, step by step171

Conditioning

Visual glossary

Words used in this lesson

PPC

Pre-pasteurisation conditioning, the hold at 45 to 52 °C before the peak.

POPC

Post-pasteurisation conditioning, the hold at 45 to 48 °C after the peak.

Thermophilic
See related figure: Connect structure with the process

Heat loving. Microbes that work best between 45 and 60 °C.

Compost, step by step172

Ammonia

Chapter opening

Ammonia

Ammonia is the commonest reason a good looking batch kills its spawn. Removing it is not the hard part. Proving it has gone is.

  • By the end you can say where the ammonia in a batch came from.
  • By the end you can explain why smell is not a measurement.
  • By the end you can ask the four questions before calling compost ready.
Compost, step by step174

Ammonia

Field notes

Where it comes from

Ammonia is nitrogen on the move. Urea, chicken manure, cotton seed cake and every other nitrogen source breaks down during Phase I, and the nitrogen leaves the material as ammonia. This is normal. DMR reports compost at the end of Phase I holding about 800 to 1,000 ppm, with pH pushed up to roughly 8.2 to 8.5.

The size of your ammonia problem is therefore decided long before the tunnel. DMR notes that a mix carrying more than 1.75 percent nitrogen loses more of it as ammonia, and that such compost attracts yellow moulds, ink caps and olive green mould.

Compost, step by step175

Ammonia

Field notes

Smell is not concentration

DMR states plainly that we generally cannot smell ammonia below 10 ppm. Read that carefully. Your nose can tell you ammonia is present. It can never tell you the level is low enough. Those are different statements, and crops are lost on the difference.

A nose also tires. After a few minutes in the corridor you stop noticing a smell that has not changed. That is olfactory fatigue, and it makes the second sniff less reliable than the first. Never deliberately breathe compost air to test a batch. Ammonia is an irritant gas and a tunnel is a confined space.

Compost, step by step176

Ammonia

Field notes

Four questions before you decide

When someone reports that the compost still smells of ammonia, do not reach for a chemical and do not add a day. Ask four questions first, because each one changes the answer.

Which stage is this: end of Phase I, mid conditioning or after cooling? What method produced the reading: an instrument, a detector tube or a nose? Where was the sample taken: front, back, top, middle or plenum? Has cooling started, since a warm mass releases ammonia that a cooled mass holds back? A reading without those four facts cannot support a spawning decision.

  • Stage
  • Method
  • Sample location
  • Cooling status
Compost, step by step177

Ammonia

Field notes

What it looks like after spawning

If ammonia is still there at spawning, the compost tells you within days. Spawn runs slowly or stops in patches. DMR lists ink caps, the black inky Coprinus mushrooms, under presence of ammonia and high nitrogen in compost. It ties Oedocephalum mould to ammonia and amines that were not eliminated during pasteurisation and conditioning.

By then nothing in that batch can be repaired, so the lesson belongs to the next one. Check the formulation nitrogen you actually stacked, the oxygen supply during conditioning, and whether your ammonia evidence was honest or convenient.

Compost, step by step178

Ammonia

Compare the evidence

Read the numbers in context

These figures belong to the named source and method. Historical costs are not current quotations. A value without its stage, material basis or measurement location is not a farm instruction.

Source-specific reference figures
What is measuredValue and basisSource and limitation
Ammonia after Phase I800 to 1,000 ppmICAR-DMR manual, 2011. Measured before Phase II, alongside pH 8.2 to 8.5
Ammonia limit at spawning8 to 10 ppmICAR-DMR manual, 2011. DMR: normally not more than 8 to 10 ppm at spawning
Compost, step by step179

Ammonia

Compare the evidence

Read the numbers in context

These figures belong to the named source and method. Historical costs are not current quotations. A value without its stage, material basis or measurement location is not a farm instruction.

Source-specific reference figures
What is measuredValue and basisSource and limitation
Smell detection floor10 ppmICAR-DMR manual, 2011. Below this the nose generally cannot detect ammonia at all
Formulation nitrogen at stacking1.5 to 1.75 percent dry weightICAR-DMR manual, 2011. Above 1.75 percent, more nitrogen is lost as ammonia and yellow moulds follow
Compost, step by step180

Ammonia

Practical workbook

Build an honest ammonia record

Record: Date, stage, method, the three points with their readings, and the decision taken on that evidence.

  1. Write down the nitrogen sources and weights you actually stacked, not the recipe.

  2. Fix three sampling points in the tunnel and use the same three every batch.

  3. Record the test method by name and keep it unchanged across batches.

  4. Note compost temperature and whether cooling had started at each test.

Compost, step by step181

Ammonia

Pause and recall

Avoid these mistakes

  • Treating the nose as an instrument, when DMR uses it only to say ammonia is present.
  • Sampling the one convenient point near the door and calling the whole tunnel clear.
  • Adding a fixed extra day of conditioning instead of finding why ammonia is not clearing.
Compost, step by step182

Ammonia

Pause and recall

Check your understanding

Choose your answer before opening the explanation. This is a learning exercise, not a competency assessment.

A worker says the tunnel smells clean, so ammonia is below 10 ppm. This is:

  1. Correct, a clean smell proves it
  2. Wrong, the nose cannot read below 10 ppm
  3. Correct if he checked twice
  4. Correct only in winter
See the answer and why

Wrong, the nose cannot read below 10 ppm DMR says we generally cannot smell ammonia below 10 ppm, so a clean smell proves nothing.

Compost, step by step183

Ammonia

Pause and recall

Check your understanding

Choose your answer before opening the explanation. This is a learning exercise, not a competency assessment.

Ink caps after spawning point mainly to:

  1. Too little nitrogen
  2. Ammonia and high nitrogen in the compost
  3. Cold casing
  4. Low humidity
See the answer and why

Ammonia and high nitrogen in the compost DMR lists ink caps against free ammonia, high nitrogen, old straw and excess moisture.

Compost, step by step184

Ammonia

Pause and recall

Check your understanding

Choose your answer before opening the explanation. This is a learning exercise, not a competency assessment.

Besides stage, method and cooling status, a reading needs:

  1. The strain
  2. The sample location
  3. The market price
  4. The room number
See the answer and why

The sample location A large mass hides local pockets, so a reading means little without its point.

Compost, step by step185

Ammonia

Visual glossary

Words used in this lesson

ppm

Parts per million. Ten ppm is ten parts of ammonia in a million parts of air.

Olfactory fatigue

The nose stops noticing a steady smell after a few minutes.

Ink cap

Coprinus, a fast black weed mushroom that signals ammonia in compost.

Compost, step by step186

Tunnel Operation

Chapter opening

Tunnel Operation

A Phase II tunnel is not a room with a heater. It is one air circuit, and the loaded compost is part of it. Read it otherwise and you chase numbers the fan never delivered.

  • By the end you can name the parts of the tunnel air circuit and their jobs.
  • By the end you can say why the fill decides how the batch will run.
  • By the end you can compare air, compost and plenum temperatures correctly.
Compost, step by step188

Tunnel Operation

Field notes

One circuit, not one box

Air leaves the fan into the plenum, the sealed space under the floor. It passes up through the perforated air floor, through the compost, into the space above, and back to the mixing section where fresh, return and exhaust dampers decide what the fan sends round again.

Every part fails quietly. A blocked floor outlet leaves a dead zone no probe may sit in. A worn door seal pulls untreated air into a pasteurised batch. A choked plenum drain holds water that cools the air from below. Inspect all of them before you fill, because once compost is in you see none of it.

Compost, step by step189

Tunnel Operation

Field notes

The fill decides the batch

DMR fills a bulk chamber to 2 to 2.2 metres, loaded so that one square metre of floor carries roughly 900 to 1,000 kg of compost. Depth is the point. Air takes the easiest path, so a shallow patch or a wheel-compacted loader track pulls air away from the rest of the mass.

Once filled, the blower brings plenum, compost and the air above to one temperature, around 45 to 48 °C. DMR describes this levelling off as a job of four to five hours. Until it is done, no tunnel reading means much.

Compost, step by step190

Tunnel Operation

Field notes

The three temperatures

A tunnel has three temperatures: the air above the compost, the compost itself, and the plenum below. DMR says the difference should be as small as possible and must not exceed 3 °C. A wider gap means air is not passing evenly through the mass.

During peak heating the compost rises at roughly 1 °C per hour and holds at 58 to 59 °C for 4 to 6 hours. Above 60 °C the process turns: DMR warns this kills the thermophilic fungi Phase II depends on, and lists it as a trigger for olive green mould.

Compost, step by step191

Tunnel Operation

Field notes

What the nameplate cannot tell you

A fan rated in kilowatts tells you what the motor draws, not what air reaches the compost. Resistance rises with fill depth, with moisture and with any compaction, so the same fan delivers different airflow on different batches.

So judge the fan by the mass, not the label. Watch plenum pressure, watch how quickly the three temperatures converge, and watch whether the far end of the tunnel behaves like the near end. Advance a batch on verified compost condition, not because one air sensor touched a set point while the compost stayed cold.

Compost, step by step192

Tunnel Operation

Compare the evidence

Read the numbers in context

These figures belong to the named source and method. Historical costs are not current quotations. A value without its stage, material basis or measurement location is not a farm instruction.

Source-specific reference figures
What is measuredValue and basisSource and limitation
Bulk tunnel fill height2 to 2.2 metresICAR-DMR manual, 2011. Loaded so one square metre of floor holds 900 to 1,000 kg
Levelling off after filling45 to 48 °CICAR-DMR manual, 2011. Plenum, compost and air brought level in four to five hours
Compost, step by step193

Tunnel Operation

Compare the evidence

Read the numbers in context

These figures belong to the named source and method. Historical costs are not current quotations. A value without its stage, material basis or measurement location is not a farm instruction.

Source-specific reference figures
What is measuredValue and basisSource and limitation
Maximum spread across the mass3 °CICAR-DMR manual, 2011. Between air above, compost and plenum
Pasteurisation hold58 to 59 °CICAR-DMR manual, 2011. Held 4 to 6 hours, reached at about 1 °C per hour
Compost, step by step194

Tunnel Operation

Compare the evidence

Read the numbers in context

These figures belong to the named source and method. Historical costs are not current quotations. A value without its stage, material basis or measurement location is not a farm instruction.

Source-specific reference figures
What is measuredValue and basisSource and limitation
Upper limit at the peak60 °CICAR-DMR manual, 2011. Above this the thermophilic fungi needed for Phase II are killed
Compost, step by step195

Tunnel Operation

Practical workbook

Inspect the tunnel before the next fill

Record: Outlets cleared, door seal, depth at three points after filling, plenum pressure empty and loaded.

  1. Sweep and open every floor outlet, then note how many were blocked.

  2. Check the door seal and clear the plenum drain until water runs freely.

  3. Mark a depth reference at three points along the tunnel length.

  4. Run the fan empty and record the plenum pressure for comparison later.

Compost, step by step196

Tunnel Operation

Pause and recall

Avoid these mistakes

  • Certifying a batch from one probe when the tunnel is metres long.
  • Overfilling or filling unevenly, which sends air around the heavy zones instead of through them.
  • Choosing a fan by motor power, with no airflow figure at the pressure a loaded tunnel creates.
Compost, step by step197

Tunnel Operation

Pause and recall

Check your understanding

Choose your answer before opening the explanation. This is a learning exercise, not a competency assessment.

DMR fills a bulk chamber to about:

  1. 1 to 1.2 metres
  2. 2 to 2.2 metres
  3. 3 to 3.5 metres
  4. 4 metres
See the answer and why

2 to 2.2 metres DMR gives 2 to 2.2 metres, at 900 to 1,000 kg per square metre of floor.

Compost, step by step198

Tunnel Operation

Pause and recall

Check your understanding

Choose your answer before opening the explanation. This is a learning exercise, not a competency assessment.

The gap between air, compost and plenum temperature should not exceed:

  1. 1 °C
  2. 3 °C
  3. 10 °C
  4. 15 °C
See the answer and why

3 °C DMR asks for the smallest possible difference and sets 3 °C as the limit.

Compost, step by step199

Tunnel Operation

Pause and recall

Check your understanding

Choose your answer before opening the explanation. This is a learning exercise, not a competency assessment.

Compost above 60 °C at the peak is harmful because it:

  1. Dries the straw
  2. Kills the thermophilic fungi Phase II needs
  3. Raises the pH
  4. Stops the fan
See the answer and why

Kills the thermophilic fungi Phase II needs DMR warns that above 60 °C organisms die, including the thermophilic fungi.

Compost, step by step200

Sensors

Chapter opening

Sensors

A number on a display is not a fact about your compost. It is a fact about one probe, in one place, at one moment.

  • By the end you can state what a reading needs before it means anything.
  • By the end you can plan where probes go in a loaded tunnel.
  • By the end you can treat sensor disagreement as useful evidence.
Compost, step by step203

Sensors

Field notes

What a reading actually is

Four facts travel with every value: where the sensor sits, when it was last checked against a reference, what unit it reports, and what the machinery was doing at that moment. Strip one away and the number becomes an opinion.

Fan state matters more than most operators expect. Compost temperature with the fan running, and the same probe ten minutes after it stopped, are not the same measurement. Write the process state beside the value every time, so the batch record can be read a month later by somebody who was not standing there.

Compost, step by step204

Sensors

Field notes

Where probes go

A loaded tunnel varies in three directions. DMR fills to 2 to 2.2 metres, so the top of the mass and the layer near the floor differ, and the far end differs from the door end.

No Indian source publishes how many probes a tunnel needs. The count follows your geometry and the zones you know go wrong, so measure it on your farm rather than copy a number. Use the DMR rule that the spread must not exceed 3 °C to test whether your coverage is enough.

  • Front and back
  • Top, middle and bottom
  • Zones with a bad history
Compost, step by step205

Sensors

Field notes

The boring checks

Check probes against a known reference on a fixed day each month, and write the check down even when nothing has drifted. A probe that is never checked is one you will eventually argue with.

Four failures hide behind a tidy screen. A value that has not moved for hours is usually a dead channel, not a stable tunnel. A jump of several degrees in a minute is usually a loose connection. A wet or bent probe reads its own condition. A probe moved at unloading and never relabelled reports the wrong end forever.

Compost, step by step206

Sensors

Field notes

Disagreement is information

When the air sensor shows 48 °C and the compost probe at the far end shows 43 °C, that gap is not a nuisance. It measures your air distribution, and it is the evidence DMR asks for when it limits the spread to 3 °C.

Do not average the two and move on, and do not quietly disable the awkward channel. Investigate the load, the floor and the dampers, write what you found, then decide. Nobody should certify compost from a screen in another room, because a screen cannot see a blocked floor outlet.

Compost, step by step207

Sensors

Compare the evidence

Read the numbers in context

These figures belong to the named source and method. Historical costs are not current quotations. A value without its stage, material basis or measurement location is not a farm instruction.

Source-specific reference figures
What is measuredValue and basisSource and limitation
Conditioning band to hold45 to 48 °CICAR-DMR manual, 2011. The band your probe map must prove everywhere
Maximum acceptable spread3 °CICAR-DMR manual, 2011. Air, compost and plenum; the test of probe coverage
Compost, step by step208

Sensors

Compare the evidence

Read the numbers in context

These figures belong to the named source and method. Historical costs are not current quotations. A value without its stage, material basis or measurement location is not a farm instruction.

Source-specific reference figures
What is measuredValue and basisSource and limitation
Pasteurisation hold to evidence58 to 59 °CICAR-DMR manual, 2011. Held 4 to 6 hours, proven in the coldest zone
Fill depth probes must cover2 to 2.2 metresICAR-DMR manual, 2011. Top, middle and bottom of this depth behave differently
Compost, step by step209

Sensors

Compare the evidence

Read the numbers in context

These figures belong to the named source and method. Historical costs are not current quotations. A value without its stage, material basis or measurement location is not a farm instruction.

Source-specific reference figures
What is measuredValue and basisSource and limitation
Number of temperature pointsby design countMushroomFarming.in guide. Follows geometry and risk zones; no universal number exists
Compost, step by step210

Sensors

Practical workbook

Draw your tunnel probe map

Record: The probe map, each monthly calibration check, and the coldest zone per batch.

  1. Sketch the tunnel from above and mark door end, far end, floor zones.

  2. Number every probe on the sketch and paint it on the cable.

  3. Note the depth each probe sits at below the compost surface.

  4. Run one batch and mark the zone that stayed coldest throughout.

Compost, step by step211

Sensors

Pause and recall

Avoid these mistakes

  • Running the tunnel from one probe near the door, the easiest zone to heat.
  • Fitting a spare probe without checking it and without updating the map.
  • Judging a batch from the control screen without walking the tunnel.
Compost, step by step212

Sensors

Pause and recall

Check your understanding

Choose your answer before opening the explanation. This is a learning exercise, not a competency assessment.

A compost probe has read exactly 47 °C for six hours. The likeliest reason is:

  1. Perfect control
  2. A dead or stuck channel
  3. An oversized fan
  4. Finished compost
See the answer and why

A dead or stuck channel A flat line over hours in living compost usually means a failed channel.

Compost, step by step213

Sensors

Pause and recall

Check your understanding

Choose your answer before opening the explanation. This is a learning exercise, not a competency assessment.

How many probes does a Phase II tunnel need?

  1. Exactly three
  2. One per tonne
  3. A number set by geometry and risk zones
  4. Twelve
See the answer and why

A number set by geometry and risk zones No Indian source publishes a probe count; it follows size, depth and problem zones.

Compost, step by step214

Sensors

Pause and recall

Check your understanding

Choose your answer before opening the explanation. This is a learning exercise, not a competency assessment.

Air at 48 °C with compost at 43 °C should be treated as:

  1. An average of 45.5 °C
  2. Evidence of poor air distribution
  3. A sensor to switch off
  4. Normal at any stage
See the answer and why

Evidence of poor air distribution DMR limits the spread to 3 °C, so a 5 °C gap is a distribution problem.

Compost, step by step215

Sensors

Visual glossary

Words used in this lesson

Calibration check
See related figure: Preparation is not finished when heating stops

Comparing an instrument with a known reference to see its drift.

Process state

What the fan, dampers and heating were doing at the reading.

Flat line

A value that stops changing, usually a failed channel.

Compost, step by step216

Quality Control

Chapter opening

Quality Control

Release is a decision, not a feeling. Compost is not certified by colour, by smell, or by a squeeze in the palm.

  • By the end you can list the checks that stand behind a release decision.
  • By the end you can name which moisture figure applies to your compost.
  • By the end you can record a missing check honestly instead of hiding it.
Compost, step by step218

Quality Control

Field notes

Release is a decision with a name on it

Somebody has to say that this batch may be spawned. That decision rests on four kinds of evidence: what you saw, what you measured, what the process record shows, and what a laboratory confirmed.

Any one of them alone will mislead you. Colour tells you about heat history but nothing about ammonia. A squeeze tells you roughly about water but nothing about pH. The batch curve tells you what the tunnel did but not what the compost became. Decide on the set, and write the name of whoever decided beside the batch number.

Compost, step by step219

Quality Control

Field notes

The checks DMR puts numbers on

DMR describes compost after Phase II as holding 64 to 66 percent moisture, with no liquid oozing when it is squeezed firmly, and free ammonia below 10 ppm. The pH that suits Agaricus bisporus mycelium is 7.2 to 7.8, and compost is cooled to 25 to 30 °C before spawning.

Final nitrogen depends on the method used: DMR gives 1.75 to 2.0 percent for long method compost, 2.0 to 2.2 percent for short method, and 2.2 to 2.5 percent for indoor bunker compost. Judge your batch by the figure for the method you ran.

  • Moisture
  • Ammonia
  • pH
  • Nitrogen
  • Temperature
Compost, step by step220

Quality Control

Field notes

The moisture figure that has two answers

Two DMR moisture figures circulate and growers mix them up. The manual says good synthetic long method compost should hold 68 to 72 percent moisture at spawning. The same manual describes compost after Phase II as 64 to 66 percent. Both are DMR figures and both are correct, because they describe different compost.

So name your compost before you name your target. Above 72 percent, DMR warns that aeration fails, conditions turn airless and plaster moulds appear. NHB links compost below 64 percent, with wet casing, to weeper mushrooms. Neither end is small.

Compost, step by step221

Quality Control

Field notes

Write down what you did not check

The most damaging line in a release sheet is the one left silently blank. If you did not test pH this batch, write not tested. If the ammonia reading came from one point rather than three, write one point. A record that hides its gaps will be trusted more than it deserves.

Small units can run this with a printed checklist and an outside laboratory a few times a season. Larger plants need a named release role, batch trends, and a written rule for a batch that fails one check but passes the rest.

Compost, step by step222

Quality Control

Compare the evidence

Read the numbers in context

These figures belong to the named source and method. Historical costs are not current quotations. A value without its stage, material basis or measurement location is not a farm instruction.

Source-specific reference figures
What is measuredValue and basisSource and limitation
Moisture after Phase II64 to 66 percentICAR-DMR manual, 2011. No liquid oozes when squeezed firmly
Moisture, synthetic long method at spawning68 to 72 percentICAR-DMR manual, 2011. A different compost from the Phase II figure
Compost, step by step223

Quality Control

Compare the evidence

Read the numbers in context

These figures belong to the named source and method. Historical costs are not current quotations. A value without its stage, material basis or measurement location is not a farm instruction.

Source-specific reference figures
What is measuredValue and basisSource and limitation
pH of finished compost7.2 to 7.8 pHICAR-DMR manual, 2011. Outside this band white plaster mould may invade
Free ammonia at spawning8 to 10 ppmICAR-DMR manual, 2011. Upper limit, tested by a declared safe method
Compost, step by step224

Quality Control

Compare the evidence

Read the numbers in context

These figures belong to the named source and method. Historical costs are not current quotations. A value without its stage, material basis or measurement location is not a farm instruction.

Source-specific reference figures
What is measuredValue and basisSource and limitation
Final nitrogen by method1.75 to 2.5 percent dry weightICAR-DMR manual, 2011. Long 1.75 to 2.0, short 2.0 to 2.2, indoor 2.2 to 2.5
Compost temperature at spawning25 to 30 °CICAR-DMR manual, 2011. Cooled gradually after conditioning
Compost, step by step225

Quality Control

Practical workbook

Write a one page release sheet

Record: Batch number, each check with its result and method, gaps, and who released it.

  1. List the five checks with the DMR figure for the method you run.

  2. Add a line for the sample points used for moisture and for ammonia.

  3. Add a not tested box beside every check so gaps cannot hide.

  4. Sign it by name and staple it to the batch record before spawning.

Compost, step by step226

Quality Control

Pause and recall

Avoid these mistakes

  • Quoting 68 to 72 percent moisture for tunnel compost DMR puts at 64 to 66 percent.
  • Treating the hand squeeze as a measurement rather than a quick screen before measuring.
  • Releasing on colour and smell when nobody recorded pH, ammonia or moisture at all.
Compost, step by step227

Quality Control

Pause and recall

Check your understanding

Choose your answer before opening the explanation. This is a learning exercise, not a competency assessment.

DMR describes compost after Phase II as holding:

  1. 55 to 60 percent moisture
  2. 64 to 66 percent moisture
  3. 75 to 80 percent moisture
  4. Any level that feels right
See the answer and why

64 to 66 percent moisture DMR gives 64 to 66 percent after Phase II, with no liquid oozing when squeezed.

Compost, step by step228

Quality Control

Pause and recall

Check your understanding

Choose your answer before opening the explanation. This is a learning exercise, not a competency assessment.

The 68 to 72 percent moisture figure applies to:

  1. Any compost at any stage
  2. Synthetic long method compost at spawning
  3. Casing soil
  4. Straw before wetting
See the answer and why

Synthetic long method compost at spawning DMR gives it for synthetic long method compost, not for Phase II compost.

Compost, step by step229

Quality Control

Pause and recall

Check your understanding

Choose your answer before opening the explanation. This is a learning exercise, not a competency assessment.

A check you could not run this batch should be:

  1. Left blank
  2. Copied from last batch
  3. Written down as not tested
  4. Estimated by eye
See the answer and why

Written down as not tested A record that hides its gaps gets trusted more than it deserves.

Compost, step by step230

Quality Control

Visual glossary

Words used in this lesson

Release

The named decision that a batch may go forward to spawning.

Weeper

A mushroom that leaks liquid, linked to dry compost under wet casing.

Plaster mould

White or brown powdery moulds that follow wrong moisture or pH.

Compost, step by step231

Sampling

Chapter opening

Sampling

A laboratory can report a number to two decimal places from a sample that never represented your batch. Precision on a bad sample is only confident error.

  • By the end you can say what question a sample is meant to answer.
  • By the end you can choose points that represent a whole tunnel.
  • By the end you can label a sample so its result stays usable.
Compost, step by step233

Sampling

Field notes

Ask the question first

Two different jobs get called sampling. One asks whether the batch may be released. The other asks why one corner behaves badly. They are not taken the same way.

For a release question you want a composite, a single mixed sample built from equal amounts taken all over the load, because you want the batch average. For a diagnosis you want the suspect zone kept separate and labelled, because the whole point is the difference. Mix a bad zone into the composite and it disappears into an average that looks acceptable while the crop fails.

Compost, step by step234

Sampling

Field notes

Where the variation lives

DMR fills a bulk tunnel to 2 to 2.2 metres, so depth alone creates three different environments, and the far end rarely matches the door end. Take from front, middle and back, at top, middle and bottom, before calling a sample representative.

Timing matters as much as position. Moisture and ammonia both change while the mass is cooling, so a sample taken at noon and one taken at midnight answer different questions. Fix the stage at which you sample, write it down, and keep it the same for every batch so the numbers can be compared.

Compost, step by step235

Sampling

Field notes

Composite without hiding a failure

Build a composite properly. Take an equal amount from every chosen point, empty them into one clean container, mix by hand with a clean tool, then reduce the pile by quartering until you have the quantity the method needs.

Three habits ruin it. A larger scoop from the easy points weights the result toward them. The loader bucket adds whatever it carried last. A sample left open while you finish the round loses the very moisture you are testing. Keep any suspect zone out of the composite and send it as its own labelled sample.

Compost, step by step236

Sampling

Field notes

Label, seal and record

A sample without a label is compost in a bag. Write batch number, point, depth, date, time, stage and compost temperature on the container, not only in a notebook, and seal it at once.

Record what you asked the laboratory for and by which method, because a pH figure depends on the water ratio and the procedure. When the result returns, file it against the same batch number as the process curve. A result that cannot be traced to a batch, a point and a stage teaches you nothing for the next fill.

Compost, step by step237

Sampling

Compare the evidence

Read the numbers in context

These figures belong to the named source and method. Historical costs are not current quotations. A value without its stage, material basis or measurement location is not a farm instruction.

Source-specific reference figures
What is measuredValue and basisSource and limitation
Fill depth to sample through2 to 2.2 metresICAR-DMR manual, 2011. Top, middle and bottom of this depth differ
Spread that sampling must detect3 °CICAR-DMR manual, 2011. DMR limit between air, compost and plenum
Compost, step by step238

Sampling

Compare the evidence

Read the numbers in context

These figures belong to the named source and method. Historical costs are not current quotations. A value without its stage, material basis or measurement location is not a farm instruction.

Source-specific reference figures
What is measuredValue and basisSource and limitation
Moisture after Phase II64 to 66 percentICAR-DMR manual, 2011. What a representative moisture sample is tested against
Free ammonia at spawning8 to 10 ppmICAR-DMR manual, 2011. Sampled at several points by a declared safe method
Compost, step by step239

Sampling

Compare the evidence

Read the numbers in context

These figures belong to the named source and method. Historical costs are not current quotations. A value without its stage, material basis or measurement location is not a farm instruction.

Source-specific reference figures
What is measuredValue and basisSource and limitation
Number of sampling pointsby design countMushroomFarming.in guide. No Indian sampling plan is published; effort rises with batch variation
Compost, step by step240

Sampling

Practical workbook

Sample one batch properly

Record: Sample identity, the nine points, stage and time, method requested, and the result.

  1. Write the decision the sample must support before you touch the compost.

  2. Mark nine points on your tunnel sketch: three positions at three depths.

  3. Take equal scoops with a clean tool and mix in a clean container.

  4. Seal, label with batch, point, depth, stage and time, and send the same day.

Compost, step by step241

Sampling

Pause and recall

Avoid these mistakes

  • Taking one convenient grab near the door and reporting it as the batch.
  • Mixing a known bad zone into the composite so the average looks acceptable.
  • Leaving samples open or unlabelled, which destroys the moisture result first.
Compost, step by step242

Sampling

Pause and recall

Check your understanding

Choose your answer before opening the explanation. This is a learning exercise, not a competency assessment.

A cold corner is suspected. The right sample is:

  1. One composite of the whole tunnel
  2. That zone kept separate and labelled
  3. A scoop from the door
  4. No sample, adjust the fan
See the answer and why

That zone kept separate and labelled Compositing a suspect zone averages away the very difference you are investigating.

Compost, step by step243

Sampling

Pause and recall

Check your understanding

Choose your answer before opening the explanation. This is a learning exercise, not a competency assessment.

A composite sample is built from:

  1. The easiest accessible point
  2. Equal amounts from every chosen point
  3. The wettest material only
  4. Whatever the loader lifts
See the answer and why

Equal amounts from every chosen point Unequal scoops weight the result toward the points that were easy to reach.

Compost, step by step244

Sampling

Pause and recall

Check your understanding

Choose your answer before opening the explanation. This is a learning exercise, not a competency assessment.

How many sampling points does a tunnel need?

  1. Three, always
  2. One per tonne
  3. A number set by size, depth and variation
  4. Nine, by Indian standard
See the answer and why

A number set by size, depth and variation No Indian source publishes a sampling plan, so effort follows the variation in your own batch.

Compost, step by step245

Sampling

Visual glossary

Words used in this lesson

Composite sample
See related figure: Preparation is not finished when heating stops

One sample mixed from equal amounts taken at many points.

Grab sample
See related figure: Preparation is not finished when heating stops

A single scoop from one point, useful only for that point.

Quartering
See related figure: Preparation is not finished when heating stops

Reducing a mixed pile by halving it repeatedly, keeping it representative.

Compost, step by step246

Troubleshooting

Chapter opening

Troubleshooting

Two batches can show the same symptom for opposite reasons. Naming a cause quickly is the fastest way to fix the wrong thing and lose the next batch as well.

  • By the end you can describe a symptom by stage, pattern and recent change.
  • By the end you can list competing causes instead of one favourite.
  • By the end you can choose the next measurement before any corrective action.
Compost, step by step248

Troubleshooting

Field notes

Describe before you diagnose

Three facts come before any cause. Which stage is this: pre-wetting, Phase I, Phase II, or after release? What is the pattern: the whole mass, one end, the top layer, or the zone beside the door? And what changed: a new straw lot, a different manure supplier, unseasonal rain, a fan that was repaired last week.

Write those three down while the batch is in front of you. A symptom described only as compost is bad cannot be investigated next month, and most compost problems are only understood by comparing several batches.

Compost, step by step249

Troubleshooting

Field notes

List competing causes

Take a heap that will not heat. DMR reports that below 1.5 percent nitrogen the material is not properly fermented and the heap may not pass 55 to 60 °C, and it sets a minimum base batch of 300 kg because small heaps lose heat too fast. The heap may also be too wet and airless, or genuinely too dry.

Each of those causes predicts something else you can check. Low nitrogen means the formulation record will show it. Too wet means leachate at the base and a sour smell. Too small means the outside is cool but the very core is warm. Go and look for what you should not find.

  • Nitrogen too low
  • Too wet and airless
  • Batch too small
  • Too dry
Compost, step by step250

Troubleshooting

Field notes

Let the numbers name the domain

Several Indian figures act as boundaries, and crossing one points at a domain. Compost above 72 percent moisture cannot aerate properly, turns airless and invites brown and white plaster moulds. NHB links compost below 64 percent, under wet casing, to weeper mushrooms.

Outside pH 7.2 to 7.8 the mycelium slows and white plaster mould may invade. Above 60 °C at pasteurisation DMR warns that the useful thermophilic fungi die and olive green mould follows. Ink caps and Oedocephalum point back at ammonia and nitrogen. The symptom does not prove the cause, but it tells you which measurement to take next.

Compost, step by step251

Troubleshooting

Field notes

Measure next, do not spray next

Compost problems are process problems. No spray corrects moisture, pH, nitrogen or air distribution, and anything applied on a mushroom farm must be checked against its current label approval and state rules before use, not chosen from an old note book.

So the next step after a diagnosis is a measurement, not a chemical. Change one thing in the limiting domain, record what you changed and why, then look for the response in the same measurement. If the response does not come, your cause was wrong and the record you kept is what lets you say so.

Compost, step by step252

Troubleshooting

Compare the evidence

Read the numbers in context

These figures belong to the named source and method. Historical costs are not current quotations. A value without its stage, material basis or measurement location is not a farm instruction.

Source-specific reference figures
What is measuredValue and basisSource and limitation
Nitrogen floor at stacking1.5 percent dry weightICAR-DMR manual, 2011. Below this the heap may not pass 55 to 60 °C
Minimum base batch300 kgICAR-DMR manual, 2011. Smaller heaps lose heat faster than they generate it
Compost, step by step253

Troubleshooting

Compare the evidence

Read the numbers in context

These figures belong to the named source and method. Historical costs are not current quotations. A value without its stage, material basis or measurement location is not a farm instruction.

Source-specific reference figures
What is measuredValue and basisSource and limitation
Moisture ceiling at spawning72 percentICAR-DMR manual, 2011. Above this aeration fails and plaster moulds appear
Moisture floor linked to weepers64 percentNHB DPR model, 2018. Dry compost under wet casing produces weeping mushrooms
Compost, step by step254

Troubleshooting

Compare the evidence

Read the numbers in context

These figures belong to the named source and method. Historical costs are not current quotations. A value without its stage, material basis or measurement location is not a farm instruction.

Source-specific reference figures
What is measuredValue and basisSource and limitation
Peak temperature ceiling60 °CICAR-DMR manual, 2011. Above this thermophilic fungi die and olive green mould follows
Compost, step by step255

Troubleshooting

Practical workbook

Run one structured investigation

Record: Symptom description, the competing causes, the evidence found and missing, the change made and the response.

  1. Write the symptom as stage, pattern and what changed recently.

  2. List three causes that could each produce that exact symptom.

  3. For each cause, write what you would expect to find if it were true.

  4. Take that measurement first, then change one thing and watch it.

Compost, step by step256

Troubleshooting

Pause and recall

Avoid these mistakes

  • Naming one cause immediately, then fixing it every batch whether or not it was there.
  • Changing three things at once, so no response can be linked to any of them.
  • Reaching for a chemical for what is a moisture, nitrogen or airflow problem.
Compost, step by step257

Troubleshooting

Pause and recall

Check your understanding

Choose your answer before opening the explanation. This is a learning exercise, not a competency assessment.

A heap will not heat. The first step is to:

  1. Add urea
  2. Describe stage, pattern and recent change
  3. Turn it twice daily
  4. Cover it with plastic
See the answer and why

Describe stage, pattern and recent change Several causes give the same symptom, so the description comes before any correction.

Compost, step by step258

Troubleshooting

Pause and recall

Check your understanding

Choose your answer before opening the explanation. This is a learning exercise, not a competency assessment.

DMR sets a minimum base batch of:

  1. 50 kg
  2. 100 kg
  3. 300 kg
  4. 1,000 kg
See the answer and why

300 kg Below about 300 kg a heap loses heat faster than the microbes can generate it.

Compost, step by step259

Troubleshooting

Pause and recall

Check your understanding

Choose your answer before opening the explanation. This is a learning exercise, not a competency assessment.

Negative evidence means:

  1. A bad result
  2. What you should find if a cause were true, and do not
  3. A failed crop
  4. A laboratory error
See the answer and why

What you should find if a cause were true, and do not Looking for what is absent is how competing causes get separated.

Compost, step by step260

Hygiene

Chapter opening

Hygiene

Compost hygiene is mostly about direction. Dirt travels toward finished compost far more easily than the other way, and it travels on a loader, a fork or a pair of boots.

  • By the end you can map your yard as zones from dirty to clean.
  • By the end you can name the movements that carry contamination backwards.
  • By the end you can handle spent compost without breeding the next problem.
Compost, step by step263

Hygiene

Field notes

One direction only

Draw your unit as a line. Raw straw and manure storage sits at the dirty end, then the Phase I yard, transfer, the Phase II tunnel, ready compost and spawning. Spent compost from the cropping rooms sits outside that line, because it is the dirtiest material on the farm.

Work should move along that line and never back up it. The same rule covers people. A worker clearing spent beds should not enter the ready compost bay in the same boots, and a visitor from the cropping room should not be shown the tunnel.

Compost, step by step264

Hygiene

Field notes

The movements that break it

Contamination rarely arrives by air. It arrives by traffic, and a few habits cause most of it.

One loader doing every job, from spent heaps in the morning to ready compost in the afternoon. Forks shared between the Phase I yard and the tunnel floor. A drain running from the spent heap across the yard where straw is stacked. Spent compost parked beside ready compost because the space was free. Each is cheap to fix: a route, a second tool, a written order of work.

  • Shared loader
  • Shared tools
  • Drainage across clean ground
  • Spent compost stored close by
Compost, step by step265

Hygiene

Field notes

End of crop and spent compost

The cheapest disease control on a mushroom farm happens when the crop is over. NHB describes a cook out at the end of the crop, holding compost at 70 °C for 12 hours to kill pathogen mycelium and spores, and notes that 70 °C for 2 to 3 hours kills all stages of pests and pathogens.

Spent compost still breeds flies. NHB advises a compost pit covered with at least 10 cm of manure, and doors and ventilators screened with nylon net of 35 mesh or finer. A 15 watt yellow light trap helps you monitor what is flying.

Compost, step by step266

Hygiene

Field notes

Chemicals are not the plan

Indian practice does use disinfectants and fumigants around compost and casing, and this course will not print a dose for any of them. Approvals, concentrations and permitted uses change, so check the current label approval and your state rules before anything is mixed, and use the protective equipment the label demands.

The reason to be careful is on the farm already. Wet bubble spores survive in casing soil for about three years, so a soil route that crosses a compost route can carry a problem for seasons. Cleaning counts only when somebody checks it and signs that it was done.

Compost, step by step267

Hygiene

Compare the evidence

Read the numbers in context

These figures belong to the named source and method. Historical costs are not current quotations. A value without its stage, material basis or measurement location is not a farm instruction.

Source-specific reference figures
What is measuredValue and basisSource and limitation
End of crop cook out70 °CNHB DPR model, 2018. Compost held 12 hours to kill pathogen mycelium and spores
Kill time for pests and pathogens2 to 3 hoursNHB DPR model, 2018. At 70 °C, all stages of pests and pathogens
Compost, step by step268

Hygiene

Compare the evidence

Read the numbers in context

These figures belong to the named source and method. Historical costs are not current quotations. A value without its stage, material basis or measurement location is not a farm instruction.

Source-specific reference figures
What is measuredValue and basisSource and limitation
Manure cover over spent compost10 cmNHB DPR model, 2018. Minimum cover in a compost pit to check fly breeding
Fly screen mesh35 meshNHB DPR model, 2018. On doors and ventilators, 35 mesh or finer
Compost, step by step269

Hygiene

Compare the evidence

Read the numbers in context

These figures belong to the named source and method. Historical costs are not current quotations. A value without its stage, material basis or measurement location is not a farm instruction.

Source-specific reference figures
What is measuredValue and basisSource and limitation
Wet bubble spore survival3 yearsICAR-DMR wet bubble folder. In casing soil, which is why soil and compost routes stay apart
Compost, step by step270

Hygiene

Practical workbook

Map the dirty to clean route

Record: The zone map, tools assigned per zone, daily cleaning and by whom, and any route broken.

  1. Draw your unit and mark each zone from raw storage to ready compost.

  2. Trace where the loader, tools, water and people cross between zones.

  3. Give the dirtiest zone its own tools and paint them a different colour.

  4. Fix the order of work for the shift so clean jobs come before dirty ones.

Compost, step by step271

Hygiene

Pause and recall

Avoid these mistakes

  • Using one loader for spent compost in the morning and ready compost in the afternoon.
  • Storing spent compost beside the ready compost bay because that space was free.
  • Trusting a chemical routine copied from an old note instead of checking current approval.
Compost, step by step272

Hygiene

Pause and recall

Check your understanding

Choose your answer before opening the explanation. This is a learning exercise, not a competency assessment.

NHB describes an end of crop cook out at:

  1. 50 °C for 2 hours
  2. 60 °C for 6 hours
  3. 70 °C for 12 hours
  4. 90 °C for 1 hour
See the answer and why

70 °C for 12 hours NHB gives 70 °C for 12 hours to kill pathogen mycelium and spores.

Compost, step by step273

Hygiene

Pause and recall

Check your understanding

Choose your answer before opening the explanation. This is a learning exercise, not a competency assessment.

The main way contamination reaches ready compost is:

  1. Through the air
  2. On loaders, tools, boots and water
  3. From the straw only
  4. From sunlight
See the answer and why

On loaders, tools, boots and water Traffic and shared equipment carry far more than airborne spread on most farms.

Compost, step by step274

Hygiene

Pause and recall

Check your understanding

Choose your answer before opening the explanation. This is a learning exercise, not a competency assessment.

Spent compost should be:

  1. Stacked near ready compost
  2. Pitted and covered with at least 10 cm of manure
  3. Left for flies to clear
  4. Spread on the straw yard
See the answer and why

Pitted and covered with at least 10 cm of manure NHB advises pitting and covering it to check fly breeding near the unit.

Compost, step by step275

Hygiene

Visual glossary

Words used in this lesson

Cook out

Heating a finished crop before emptying, so pests and pathogens die.

Spent compost
See related figure: End of crop and spent compost

Compost left after the last flush, the dirtiest material on the farm.

Mesh

Openings per inch in a net. A higher number means a finer screen.

Compost, step by step276

Batch Records

Chapter opening

Batch Records

Every crop failure is investigated backwards. If the batch record stops at the tunnel door, the investigation stops there, and the batch comes back next month.

  • By the end you can list what belongs in a compost batch record.
  • By the end you can write an entry that someone else can act on.
  • By the end you can carry a batch number forward into the crop.
Compost, step by step278

Batch Records

Field notes

What a batch record holds

A batch record is not a temperature chart. It holds five things: the identity of the batch, the inputs that went into it, the process it passed through, every deviation from plan, and the decisions people took.

Each entry carries the same fields, and the last two are the ones farms skip. Stage. Measurement, with its point. Equipment state, meaning what the fan and dampers were doing. The deviation. The action. The reason for it. And the result, written later when you went back and looked. A record with actions but no results teaches nobody anything.

Compost, step by step279

Batch Records

Field notes

Start with what you actually used

Write down the lots, not the recipe. Which straw, from which supplier, how many bales and how old. Which manure, from where, arriving when. The weights you actually put on the heap, including the substitution you made when the cotton seed cake did not arrive.

Mass tells the truth later. DMR reports that a tonne of straw yields about 1.75 to 2.0 tonnes of long method compost, 2.0 to 2.5 by short method and 3.0 to 3.5 by indoor bunker. If your ratio drifts far from the method you ran, either the water or the record is wrong.

Compost, step by step280

Batch Records

Field notes

The process states worth logging

Log the states a decision hangs on rather than everything a controller can print. The fill, in tonnes and kilograms per square metre, since DMR works to 900 to 1,000 kg. The levelling off at 45 to 48 °C. The peak at 58 to 59 °C and the hours held there. The conditioning hold, the days it ran, and the ammonia evidence that ended it.

Beside each, write the fan and damper state and the initials of the person on shift. Two identical curves with different people and weather are not the same batch.

  • Fill
  • Levelling
  • Peak
  • Conditioning
  • Release
Compost, step by step281

Batch Records

Field notes

Carry the number forward

The batch number should not die at spawning. It belongs on the room sheet, the spawn lot and the yield record, because that is the only way a third flush problem traces back to a formulation change six weeks earlier.

Paper is fine for a small unit if it is complete and legible and kept where the next shift can read it. What matters is that the record was written while the work happened. A record filled in from memory on Sunday evening is a story, and stories cannot be investigated.

Compost, step by step282

Batch Records

Compare the evidence

Read the numbers in context

These figures belong to the named source and method. Historical costs are not current quotations. A value without its stage, material basis or measurement location is not a farm instruction.

Source-specific reference figures
What is measuredValue and basisSource and limitation
Fill loading to record900 to 1,000 kg per square metreICAR-DMR manual, 2011. At a fill height of 2 to 2.2 metres
Levelling off temperature45 to 48 °CICAR-DMR manual, 2011. Log the hour it was reached after filling
Compost, step by step283

Batch Records

Compare the evidence

Read the numbers in context

These figures belong to the named source and method. Historical costs are not current quotations. A value without its stage, material basis or measurement location is not a farm instruction.

Source-specific reference figures
What is measuredValue and basisSource and limitation
Peak hold58 to 59 °CICAR-DMR manual, 2011. Record start and end hours of the 4 to 6 hour hold
Conditioning hold3 to 4 daysICAR-DMR manual, 2011. Bulk tunnel; log the ammonia evidence that ended it
Compost, step by step284

Batch Records

Compare the evidence

Read the numbers in context

These figures belong to the named source and method. Historical costs are not current quotations. A value without its stage, material basis or measurement location is not a farm instruction.

Source-specific reference figures
What is measuredValue and basisSource and limitation
Compost per tonne of straw1.75 to 3.5 tonnesICAR-DMR manual, 2011. Long 1.75 to 2.0, short 2.0 to 2.5, indoor 3.0 to 3.5
Compost, step by step285

Batch Records

Practical workbook

Rebuild your batch sheet

Record: Batch number, input lots and weights, process states with times, deviations, actions with reasons, results.

  1. Print one sheet per batch with a number at the top.

  2. Add rows for lots and weights actually used, not the standard recipe.

  3. Add a deviation column beside every process row.

  4. Write the result of each action a day later, in the same row.

Compost, step by step286

Batch Records

Pause and recall

Avoid these mistakes

  • Recording the recipe instead of the weights and substitutions actually used.
  • Filling the sheet from memory at the end of the week, when the detail has gone.
  • Ending the record at spawning, so no crop problem traces back to the compost.
Compost, step by step287

Batch Records

Pause and recall

Check your understanding

Choose your answer before opening the explanation. This is a learning exercise, not a competency assessment.

The field most often missing from a farm record is:

  1. The date
  2. The temperature
  3. The result of the action taken
  4. The batch number
See the answer and why

The result of the action taken Actions are usually written down; whether they worked is what goes unrecorded.

Compost, step by step288

Batch Records

Pause and recall

Check your understanding

Choose your answer before opening the explanation. This is a learning exercise, not a competency assessment.

DMR reports that one tonne of straw yields, by long method:

  1. 0.5 tonnes of compost
  2. 1.75 to 2.0 tonnes
  3. 3.0 to 3.5 tonnes
  4. 5 tonnes
See the answer and why

1.75 to 2.0 tonnes DMR gives 1.75 to 2.0 tonnes for long method and 3.0 to 3.5 for indoor.

Compost, step by step289

Batch Records

Pause and recall

Check your understanding

Choose your answer before opening the explanation. This is a learning exercise, not a competency assessment.

A batch number should be carried:

  1. Only to the tunnel
  2. Into the spawning room and the yield record
  3. Nowhere, it is internal
  4. Only for exported compost
See the answer and why

Into the spawning room and the yield record A third flush problem can only be traced back if the number followed the compost.

Compost, step by step290

Batch Records

Visual glossary

Words used in this lesson

Deviation

Any point where the batch did not follow the plan.

Batch identity
See related figure: Follow one batch from input to sale

The number that ties inputs, process, release and crop together.

Mass balance

Comparing compost produced against straw used, as a check.

Compost, step by step291

Practise and review

Pause and recall

Mistakes to avoid

A hot reading proves the whole batch is ready. Review representative locations and the full release criteria.

Mixing steps from different compost methods. Follow one complete method and document qualified review of substitutions.

Compost, step by step293

Practise and review

Practical workbook

Review a deliberately incomplete batch sheet

Remove the moisture basis, one sensor location and the release sign-off from a training copy. Identify what conclusions can no longer be made.

Compost, step by step294

Sources and next steps

Sources & further reading

Keep learning with the field guides

English editorial teaching material. Independent technical review and full Hindi translation remain pending. Reading or completing an exercise is not proof of practical competence.

Illustrations are not diagnostic evidence, construction drawings or operating specifications. Use species-, strain- and method-specific guidance for practical work.

Compost, step by step295

English learning edition · Independent technical review pending. Keyboard: focus the reading page and use ← / →. Page turning does not mark practical competence.